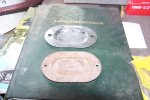
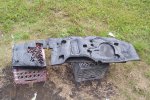
 Now its time to turn to the floors and firewall. The first thing is the floorpan plugs. In this picture you can see the repo plugs versus an original plug. Notice that the
original has a hump while the repo just has a bump in the middle ?
Now its time to turn to the floors and firewall. The first thing is the floorpan plugs. In this picture you can see the repo plugs versus an original plug. Notice that the
original has a hump while the repo just has a bump in the middle ?
|
|
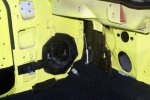
 Here are the repos installed. I used a bead of gray strip caulk as a sealer. At this point I installed black duct tape in the locations where Ford had put tape on this car. Ford used a 3" wide tape
which is not available. In this picture you can see tape on the sides of the inner rocker panel, the ridge by the rear torque box and on top of the rocker panels, which requires the wiring to be installed
prior to laying the tape down.
Here are the repos installed. I used a bead of gray strip caulk as a sealer. At this point I installed black duct tape in the locations where Ford had put tape on this car. Ford used a 3" wide tape
which is not available. In this picture you can see tape on the sides of the inner rocker panel, the ridge by the rear torque box and on top of the rocker panels, which requires the wiring to be installed
prior to laying the tape down.
|
|
 On top of the upper cowl, just inside the windshield on both ends are two holes. On some cars these holes had plugs in them and some had tape. I'm not sure why that is. Perhaps they couldn't put plugs in them
if the seam sealer filled the hole too much. This particular car came with tape, so that is what I stuck with.
On top of the upper cowl, just inside the windshield on both ends are two holes. On some cars these holes had plugs in them and some had tape. I'm not sure why that is. Perhaps they couldn't put plugs in them
if the seam sealer filled the hole too much. This particular car came with tape, so that is what I stuck with.
|
|
 Here is a picture of the plugs that were used on some cars. This particular car was built at the same plant, NJ, but two weeks later.
|
|
 This is the time that I install the underlayment and trim it if necessary. in this particular case the hole was in the wrong location for the passengers seat belt. The hole for the A/C drain hose is not
done at this time.
This is the time that I install the underlayment and trim it if necessary. in this particular case the hole was in the wrong location for the passengers seat belt. The hole for the A/C drain hose is not
done at this time.
|
|
 I never use repo firewall insulation, since the repos are 100% wrong, even the $100 ones. Here is my super secret restoration technique. I spray the old one with a good quality rubberized undercoating
and then I give it a coat of satin clear.
I never use repo firewall insulation, since the repos are 100% wrong, even the $100 ones. Here is my super secret restoration technique. I spray the old one with a good quality rubberized undercoating
and then I give it a coat of satin clear.
|
|
 The first thing that goes in is the kick panel vents followed by the left section of the firewall insulation. The dimmer switch is then
screwed to the floor and the front emergency brake cable is fed through the floor. Since the carpet needs to be trimmed for the dimmer switch and emergency brake cable, this is the easiest way to do it.
In this picture the trimming has already been done.
The first thing that goes in is the kick panel vents followed by the left section of the firewall insulation. The dimmer switch is then
screwed to the floor and the front emergency brake cable is fed through the floor. Since the carpet needs to be trimmed for the dimmer switch and emergency brake cable, this is the easiest way to do it.
In this picture the trimming has already been done.
|
|
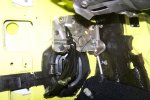 Next comes the emergency brake. You may notice the white piece of plastic with the copper band on it. This car came with a parking braking warning light. One the emergency brake pedal is pressed the
copper band becomes grounded, which then turns on the dash light.
Next comes the emergency brake. You may notice the white piece of plastic with the copper band on it. This car came with a parking braking warning light. One the emergency brake pedal is pressed the
copper band becomes grounded, which then turns on the dash light.
|
|
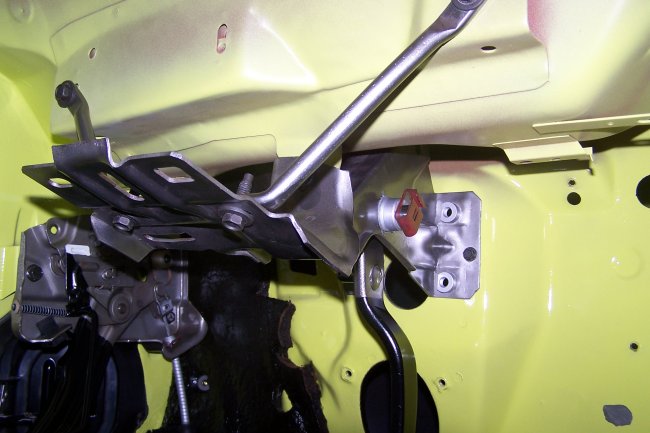
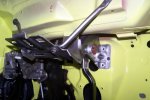 Then comes the pedal support assembly. It is a good idea to install the master brake cylinder at this point. Mine was on order so I had to do it later.
|
|
 Then the large section of the firewall insulation goes in. It is only held in with two rubber plugs. The best way to get them in is to pull them out through the engine compartment with a pair
of pliers.
Then the large section of the firewall insulation goes in. It is only held in with two rubber plugs. The best way to get them in is to pull them out through the engine compartment with a pair
of pliers.
|
|
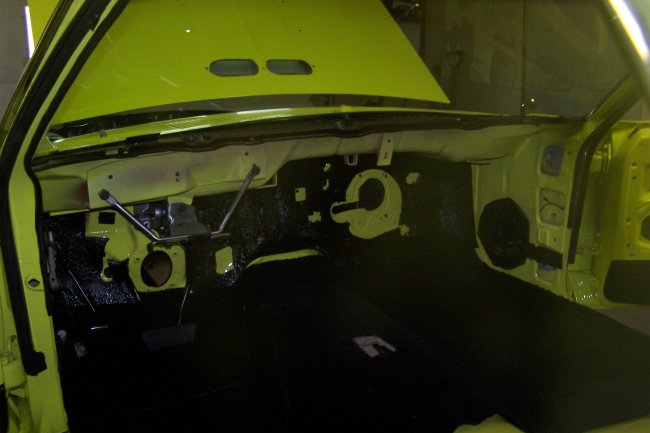
 Next comes the a/c heater box and ducts. Note: the carpet is not properly set in this picture.
|
|
 Here is a view of the firewall showing the mounting hardware for the a/c heater box. You can't buy new washers so you have to restore your originals. On this car the washers had a phosphate and oil finish.
|
|
 Now comes the lower dash assembly. Ford used tapping screws in the upper corners to hold them in place while attaching everything. They bolted the lower dash in place last. Sometimes they got lucky and the
tapping screws didn't have to be removed. In this case only the one on the driver's side had to be removed.
Now comes the lower dash assembly. Ford used tapping screws in the upper corners to hold them in place while attaching everything. They bolted the lower dash in place last. Sometimes they got lucky and the
tapping screws didn't have to be removed. In this case only the one on the driver's side had to be removed.
|
|
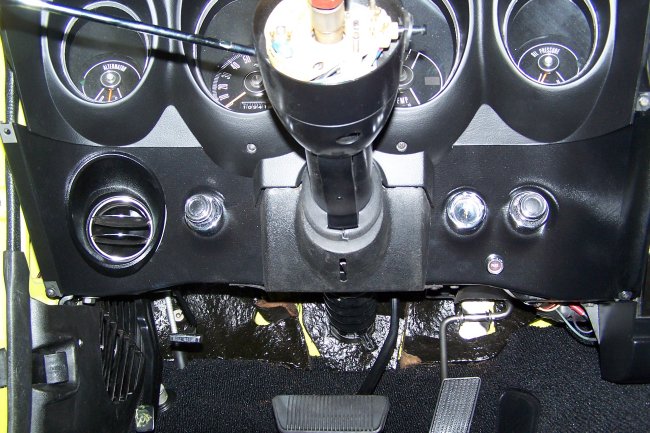
 Next comes the instrument cluster and radio.
|
|
 I waited until the master cylinder came in before I installed the steering column.
|
|
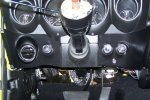
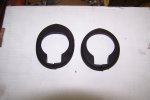 On fastbacks Ford did something special. They shimmed the steering column down using the same aluminum blocks that are in the upper steering column bracket.
Because of this they had to use a special plastic collar to cover the gap at the top which was created by the shims. In this picture you can see both styles. The one on the
left was used on fastbacks, while the one on the right was used on coupes and convertibles.
On fastbacks Ford did something special. They shimmed the steering column down using the same aluminum blocks that are in the upper steering column bracket.
Because of this they had to use a special plastic collar to cover the gap at the top which was created by the shims. In this picture you can see both styles. The one on the
left was used on fastbacks, while the one on the right was used on coupes and convertibles.
|
|
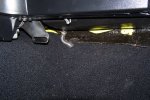 The last thing to get done on the firewall was to properly fit the carpet and install the drain hose for the AC. I cut the hole though the carpet and underlayment from
within the engine compartment. As you can see in this picture Ford wasn't very good at drilling the hole in the right place.
The last thing to get done on the firewall was to properly fit the carpet and install the drain hose for the AC. I cut the hole though the carpet and underlayment from
within the engine compartment. As you can see in this picture Ford wasn't very good at drilling the hole in the right place.
|
 Now its time to turn to the floors and firewall. The first thing is the floorpan plugs. In this picture you can see the repo plugs versus an original plug. Notice that the
original has a hump while the repo just has a bump in the middle ?
Now its time to turn to the floors and firewall. The first thing is the floorpan plugs. In this picture you can see the repo plugs versus an original plug. Notice that the
original has a hump while the repo just has a bump in the middle ?
 Here are the repos installed. I used a bead of gray strip caulk as a sealer. At this point I installed black duct tape in the locations where Ford had put tape on this car. Ford used a 3" wide tape
which is not available. In this picture you can see tape on the sides of the inner rocker panel, the ridge by the rear torque box and on top of the rocker panels, which requires the wiring to be installed
prior to laying the tape down.
Here are the repos installed. I used a bead of gray strip caulk as a sealer. At this point I installed black duct tape in the locations where Ford had put tape on this car. Ford used a 3" wide tape
which is not available. In this picture you can see tape on the sides of the inner rocker panel, the ridge by the rear torque box and on top of the rocker panels, which requires the wiring to be installed
prior to laying the tape down.
 On top of the upper cowl, just inside the windshield on both ends are two holes. On some cars these holes had plugs in them and some had tape. I'm not sure why that is. Perhaps they couldn't put plugs in them
if the seam sealer filled the hole too much. This particular car came with tape, so that is what I stuck with.
On top of the upper cowl, just inside the windshield on both ends are two holes. On some cars these holes had plugs in them and some had tape. I'm not sure why that is. Perhaps they couldn't put plugs in them
if the seam sealer filled the hole too much. This particular car came with tape, so that is what I stuck with.
 Here is a picture of the plugs that were used on some cars. This particular car was built at the same plant, NJ, but two weeks later.
 This is the time that I install the underlayment and trim it if necessary. in this particular case the hole was in the wrong location for the passengers seat belt. The hole for the A/C drain hose is not
done at this time.
This is the time that I install the underlayment and trim it if necessary. in this particular case the hole was in the wrong location for the passengers seat belt. The hole for the A/C drain hose is not
done at this time.
 I never use repo firewall insulation, since the repos are 100% wrong, even the $100 ones. Here is my super secret restoration technique. I spray the old one with a good quality rubberized undercoating
and then I give it a coat of satin clear.
I never use repo firewall insulation, since the repos are 100% wrong, even the $100 ones. Here is my super secret restoration technique. I spray the old one with a good quality rubberized undercoating
and then I give it a coat of satin clear.
 The first thing that goes in is the kick panel vents followed by the left section of the firewall insulation. The dimmer switch is then
screwed to the floor and the front emergency brake cable is fed through the floor. Since the carpet needs to be trimmed for the dimmer switch and emergency brake cable, this is the easiest way to do it.
In this picture the trimming has already been done.
The first thing that goes in is the kick panel vents followed by the left section of the firewall insulation. The dimmer switch is then
screwed to the floor and the front emergency brake cable is fed through the floor. Since the carpet needs to be trimmed for the dimmer switch and emergency brake cable, this is the easiest way to do it.
In this picture the trimming has already been done.
 Next comes the emergency brake. You may notice the white piece of plastic with the copper band on it. This car came with a parking braking warning light. One the emergency brake pedal is pressed the
copper band becomes grounded, which then turns on the dash light.
Next comes the emergency brake. You may notice the white piece of plastic with the copper band on it. This car came with a parking braking warning light. One the emergency brake pedal is pressed the
copper band becomes grounded, which then turns on the dash light.
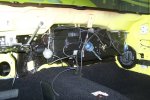
 Then comes the pedal support assembly. It is a good idea to install the master brake cylinder at this point. Mine was on order so I had to do it later.
 Then the large section of the firewall insulation goes in. It is only held in with two rubber plugs. The best way to get them in is to pull them out through the engine compartment with a pair
of pliers.
Then the large section of the firewall insulation goes in. It is only held in with two rubber plugs. The best way to get them in is to pull them out through the engine compartment with a pair
of pliers.
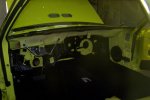
 Next comes the a/c heater box and ducts. Note: the carpet is not properly set in this picture.
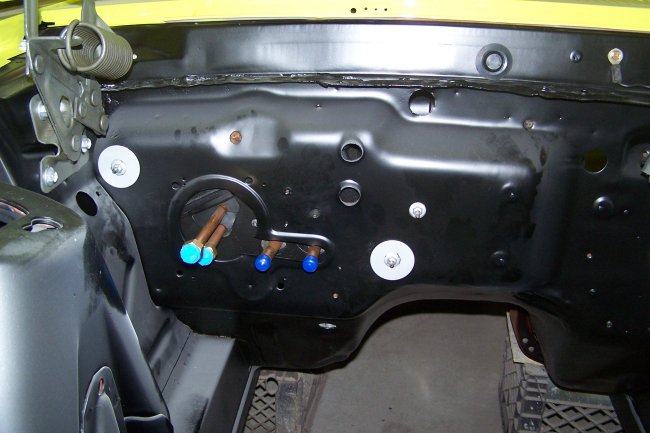 Here is a view of the firewall showing the mounting hardware for the a/c heater box. You can't buy new washers so you have to restore your originals. On this car the washers had a phosphate and oil finish.
 Now comes the lower dash assembly. Ford used tapping screws in the upper corners to hold them in place while attaching everything. They bolted the lower dash in place last. Sometimes they got lucky and the
tapping screws didn't have to be removed. In this case only the one on the driver's side had to be removed.
Now comes the lower dash assembly. Ford used tapping screws in the upper corners to hold them in place while attaching everything. They bolted the lower dash in place last. Sometimes they got lucky and the
tapping screws didn't have to be removed. In this case only the one on the driver's side had to be removed.
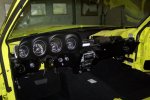
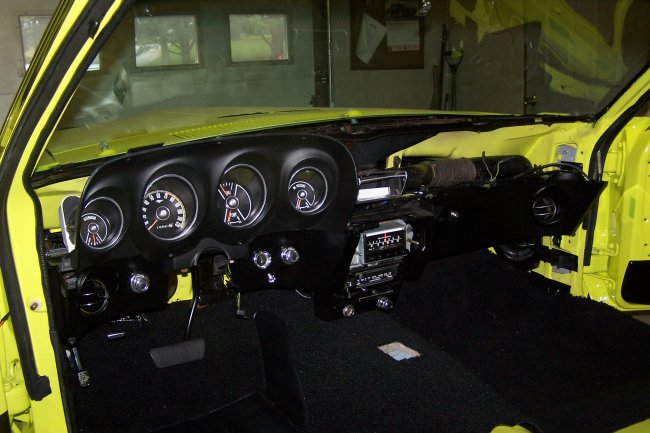 Next comes the instrument cluster and radio.
 I waited until the master cylinder came in before I installed the steering column.
 On fastbacks Ford did something special. They shimmed the steering column down using the same aluminum blocks that are in the upper steering column bracket.
Because of this they had to use a special plastic collar to cover the gap at the top which was created by the shims. In this picture you can see both styles. The one on the
left was used on fastbacks, while the one on the right was used on coupes and convertibles.
On fastbacks Ford did something special. They shimmed the steering column down using the same aluminum blocks that are in the upper steering column bracket.
Because of this they had to use a special plastic collar to cover the gap at the top which was created by the shims. In this picture you can see both styles. The one on the
left was used on fastbacks, while the one on the right was used on coupes and convertibles.
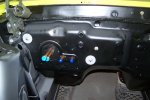
 The last thing to get done on the firewall was to properly fit the carpet and install the drain hose for the AC. I cut the hole though the carpet and underlayment from
within the engine compartment. As you can see in this picture Ford wasn't very good at drilling the hole in the right place.
The last thing to get done on the firewall was to properly fit the carpet and install the drain hose for the AC. I cut the hole though the carpet and underlayment from
within the engine compartment. As you can see in this picture Ford wasn't very good at drilling the hole in the right place.