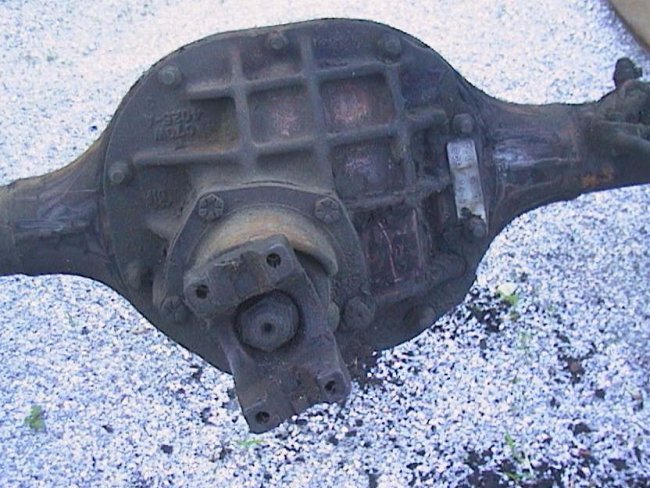
 Here is a picture of the differential after I removed the rear end. I guess nobody wanted to steal this ID tag. Though they did tag the steering box tag, the buck tag
and the warranty plate. It was interesting that the Buck Tag was returned and nothing else.
Here is a picture of the differential after I removed the rear end. I guess nobody wanted to steal this ID tag. Though they did tag the steering box tag, the buck tag
and the warranty plate. It was interesting that the Buck Tag was returned and nothing else.
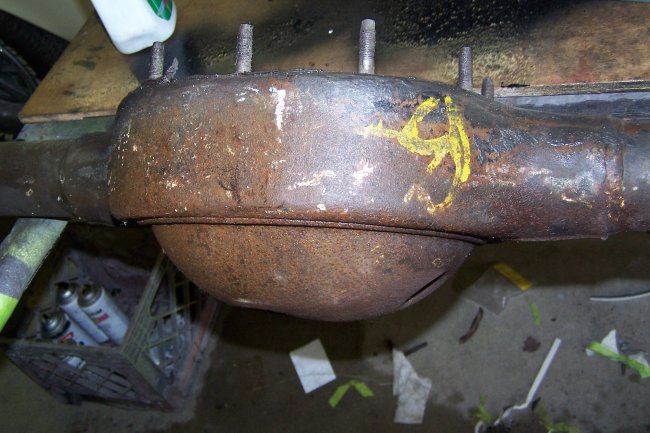 I dismantled the rearend and carefully cleaned the parts in hopes of finding some original factory markings. This big "B-" was the only mark I found on the housing.
 I found a big yellow daug, a gray daub (not shown) and a big aqua mark on the yoke. The aqua mark was applied after the U-bolts where installed, so it must have been an inspection mark. The
yellow mark would have coinsided with a mark on the drive shaft.
I found a big yellow daug, a gray daub (not shown) and a big aqua mark on the yoke. The aqua mark was applied after the U-bolts where installed, so it must have been an inspection mark. The
yellow mark would have coinsided with a mark on the drive shaft.
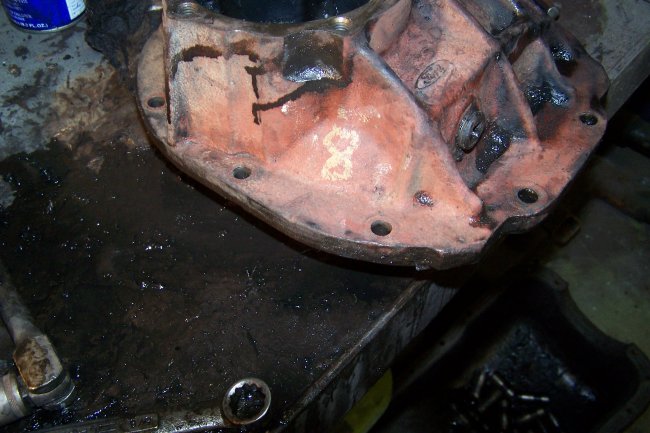 This number "8" was the only mark I could find on the differential case. Maybe it refers to an 8" rearend.
 I dismantled and cleaned the differential and then inspected all of the parts for wear. I couldn't find any problems so I didn't bother doing a rebuild.
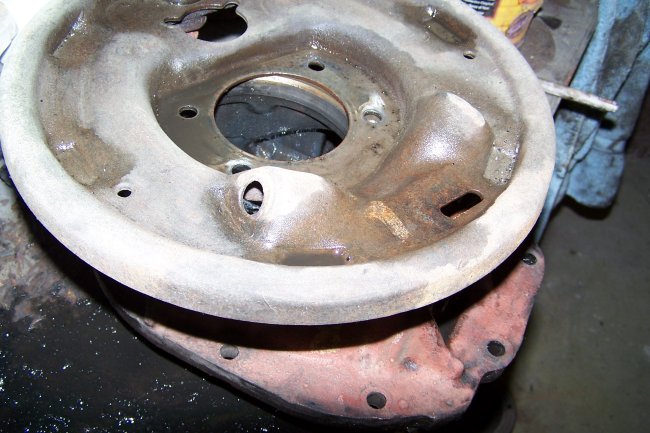 I dismantled and cleaned the backing plates.On both sides a found white vertical marks next to the adjuster holes (both towards the front of the car). With everything dismantled I sandblasted and
painted the parts. The rear axle housing and backing plates where painted semi-gloss black, the differential case and yoke were primed with DP74LF red epoxy primer and the axle shafts received new bearings
and then were painted cast gray.
I dismantled and cleaned the backing plates.On both sides a found white vertical marks next to the adjuster holes (both towards the front of the car). With everything dismantled I sandblasted and
painted the parts. The rear axle housing and backing plates where painted semi-gloss black, the differential case and yoke were primed with DP74LF red epoxy primer and the axle shafts received new bearings
and then were painted cast gray.
 Ford used more than one supplier for the brake assemblies. On the left rear side of this car a brake assembly by manufactured KH was installed.
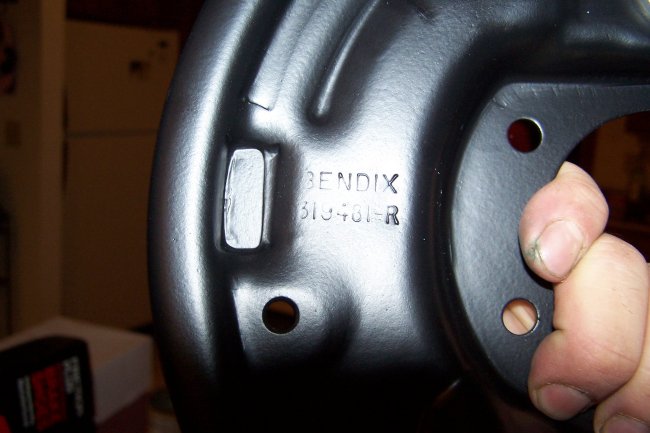 On the right rear side of this car a brake assembly by Bendix was installed. It should be noted that the e-brake cable bracket and the shoe spacer bracket for the right side as also
stamped "bendix" and the brackets for the left side were stamped "KH".
On the right rear side of this car a brake assembly by Bendix was installed. It should be noted that the e-brake cable bracket and the shoe spacer bracket for the right side as also
stamped "bendix" and the brackets for the left side were stamped "KH".
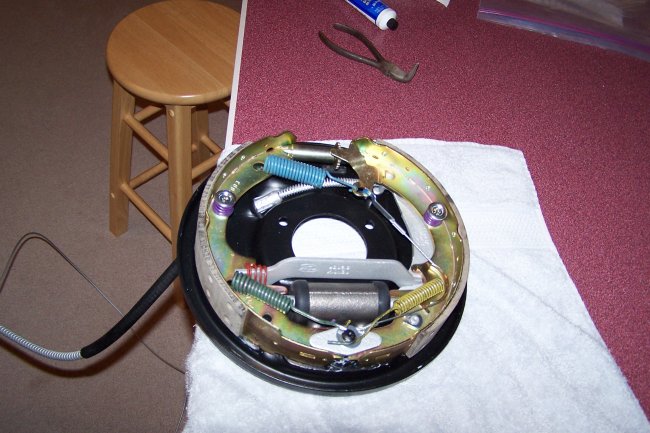 Here is the right rear (bendix) brake assembly all rebuilt and ready to install.
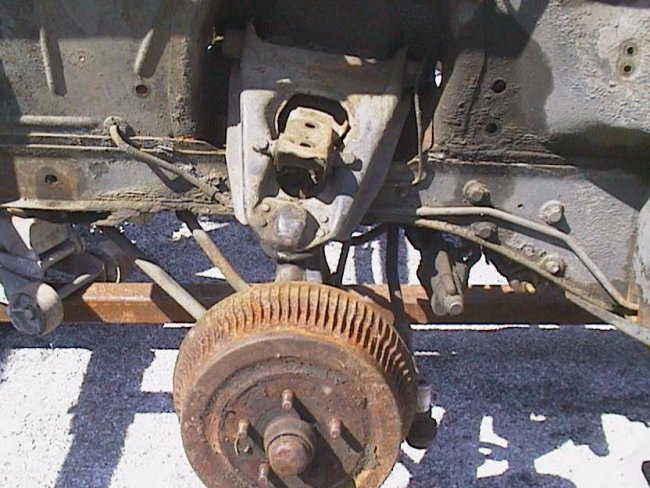
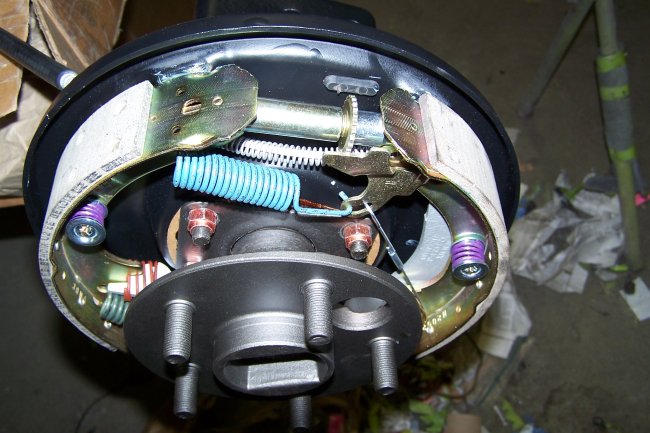 Here it is installed on the differntial housing with the axle shaft installed. I replaced the axle shaft bearings, seals and gaskets.
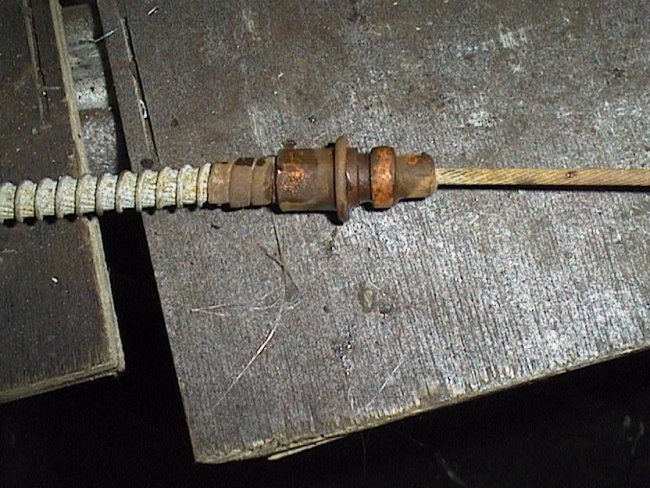 I reused the original emergence brake cables. I just beadblasted them and gave them a coat of satin clear. Before I beadblasted them I found orange marks on them where they were
clipped to the car. It appears that these marks were applied after the cables were installed.
I reused the original emergence brake cables. I just beadblasted them and gave them a coat of satin clear. Before I beadblasted them I found orange marks on them where they were
clipped to the car. It appears that these marks were applied after the cables were installed.
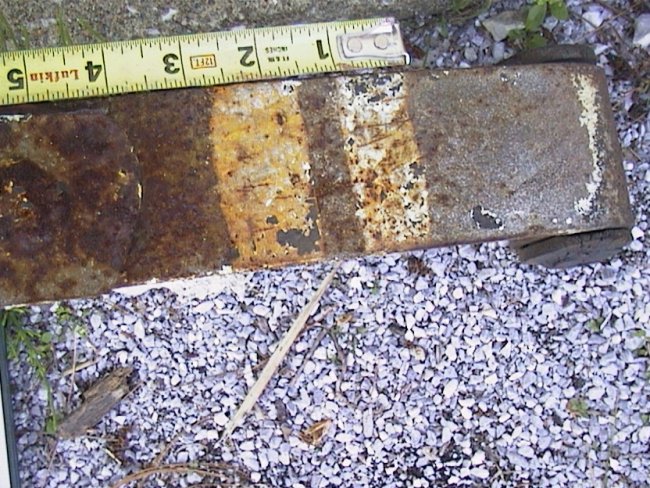 The rear leafsprings were found to have two yellow stripes on them. The buildsheet for this car would have "YELYEL" originally listed for rear springs. This was done
to help the autoworker to identify which set of springs to install on the car.
The rear leafsprings were found to have two yellow stripes on them. The buildsheet for this car would have "YELYEL" originally listed for rear springs. This was done
to help the autoworker to identify which set of springs to install on the car.
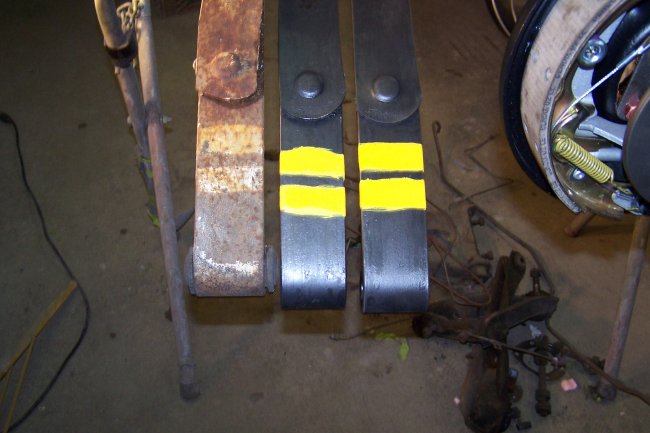 I bought a brand new set of springs from Eaton Springs, which was one of Fords original suppliers. They come painted (though you can order them without paint for $75 more). They are virtually identical
to the originals, but without the Ford partnumber stamped into them on the short leaf. It is very common for restores to use there original short leaf on a new set of springs from Eaton. When I removed the
paint I found that the springs had an excellent treated look, which would have been what the original springs looked like when new. I just gave them a coat of satin clear to protect them and then I painted
on the yellow stripes using the original springs as a reference. It should be noted the the stripes only go on the underside of the springs towards the rear of the car.
I bought a brand new set of springs from Eaton Springs, which was one of Fords original suppliers. They come painted (though you can order them without paint for $75 more). They are virtually identical
to the originals, but without the Ford partnumber stamped into them on the short leaf. It is very common for restores to use there original short leaf on a new set of springs from Eaton. When I removed the
paint I found that the springs had an excellent treated look, which would have been what the original springs looked like when new. I just gave them a coat of satin clear to protect them and then I painted
on the yellow stripes using the original springs as a reference. It should be noted the the stripes only go on the underside of the springs towards the rear of the car.
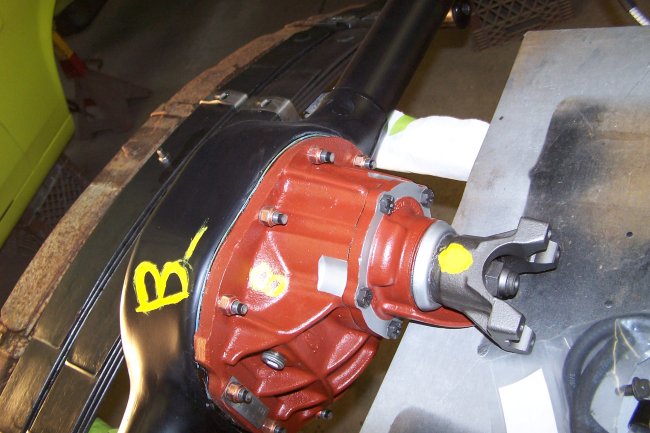 Here is the rearend all back together with the inspection marks applied. The aqua mark mentioned earlied gets applied when the driveshaft gets installed. The differential case was primed using DP74LF red epoxy primer. The surfaces that
were originally machined bare at the factory were painted with a natural looking silver paint so they would not rust.
Here is the rearend all back together with the inspection marks applied. The aqua mark mentioned earlied gets applied when the driveshaft gets installed. The differential case was primed using DP74LF red epoxy primer. The surfaces that
were originally machined bare at the factory were painted with a natural looking silver paint so they would not rust.
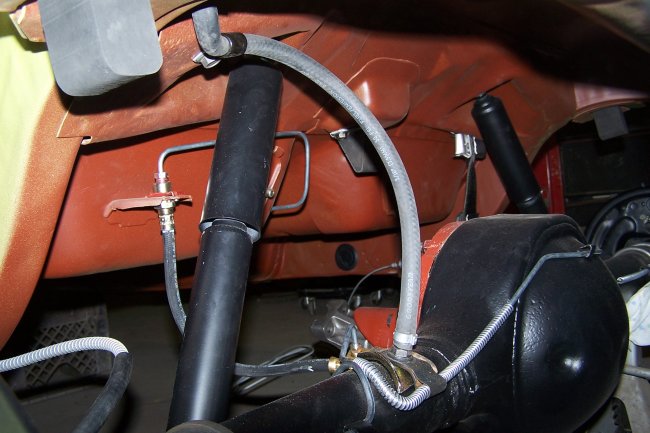
 Here is the brake line connections at the junction block/hose. The axle vent holds it all in place. All brake lines were replaced with new ones.
 Here is the brake line connection at one of the backing plates. In this picture you can see the phosphate finish of the T-bolts , the yellow cad finish for the brake pins and the natural
finish of the new brake cylinders. Note: The white inspeciton mark can not been seen in this picture.
Here is the brake line connection at one of the backing plates. In this picture you can see the phosphate finish of the T-bolts , the yellow cad finish for the brake pins and the natural
finish of the new brake cylinders. Note: The white inspeciton mark can not been seen in this picture.
 Here is a picture of the brake hose and axle vent connections after the rearend was installed. The vent hose goes in to a hole in the shell.
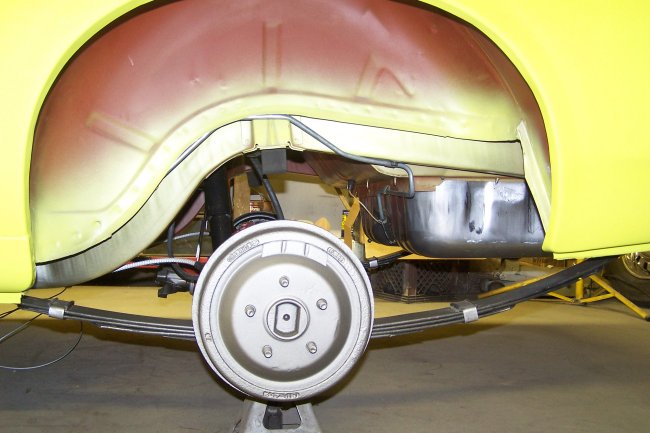 Here is a side shot. I didn't bother undercoating the wheel wells until everthing was installed, so that I wouldn't mark it up. The brake drum was painted to give it a natural cast "look". If this car had originally came with styled steel wheels
the face of the drums would have been painted black, which would have been brushed on.
Here is a side shot. I didn't bother undercoating the wheel wells until everthing was installed, so that I wouldn't mark it up. The brake drum was painted to give it a natural cast "look". If this car had originally came with styled steel wheels
the face of the drums would have been painted black, which would have been brushed on.
 He is the driver's side front suspension when I started. This picture was taken just after I removed the coil spring. (scroll down to the bottom of the page to see the restored view)
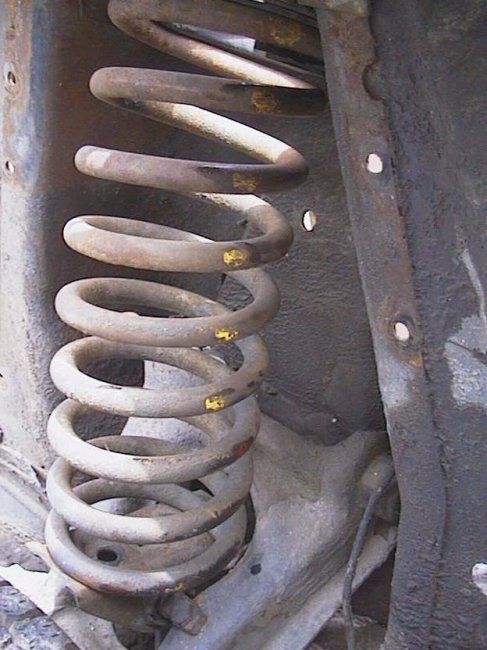 This picture of the coil spring shows the original factory markings, which are yellow and red. As with the rear springs, these colors correspond to the spring code of "YELRED" on the cars build sheet.
Notice that the markings are towards the rear ? It is way, way too common for restores to paint these markings on their restored cars facing outwards. Well, that's wrong ! The marks were applied when the springs where made.
The marks could be anywhere. Infact I have never seen originals with the marks facing outwards. They always seem to be facing the rear or the front. So when I restored this car I made sure that I put the marks in their
original location. You can see that by comparing this picture to the one at the very bottom of the page.
This picture of the coil spring shows the original factory markings, which are yellow and red. As with the rear springs, these colors correspond to the spring code of "YELRED" on the cars build sheet.
Notice that the markings are towards the rear ? It is way, way too common for restores to paint these markings on their restored cars facing outwards. Well, that's wrong ! The marks were applied when the springs where made.
The marks could be anywhere. Infact I have never seen originals with the marks facing outwards. They always seem to be facing the rear or the front. So when I restored this car I made sure that I put the marks in their
original location. You can see that by comparing this picture to the one at the very bottom of the page.
 Here are the spindles strut rods and coil springs after restoration. The spindles where paint with gray cast blast and a dusting of black paint to give them the treated metal look. The strut rods were wire wheeled, given a wiping of gun blueing to
give them a heat treated look and then sprayed with satin clear to keep them from rusting. The coil springs where painted with semi-gloss rustoleum. As you can see the color codes where applied, but not symmetrically or spaced evenly. They were applied exactly
in the same manner and locations as the factory had originally done.
Here are the spindles strut rods and coil springs after restoration. The spindles where paint with gray cast blast and a dusting of black paint to give them the treated metal look. The strut rods were wire wheeled, given a wiping of gun blueing to
give them a heat treated look and then sprayed with satin clear to keep them from rusting. The coil springs where painted with semi-gloss rustoleum. As you can see the color codes where applied, but not symmetrically or spaced evenly. They were applied exactly
in the same manner and locations as the factory had originally done.
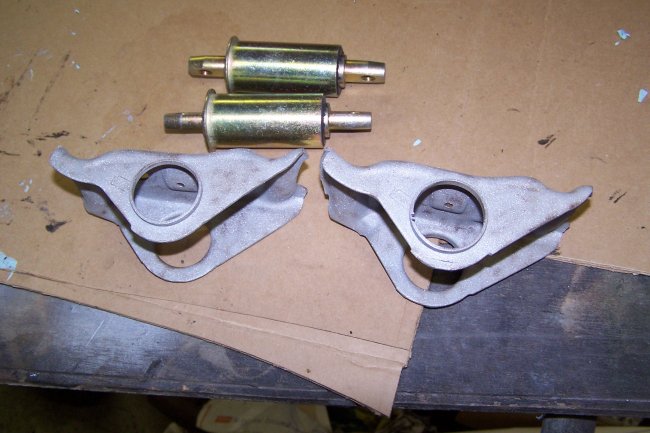 Though you can buy new ones, I rebuilt my spring perches. The only real trick is to install the bushings rotated at the right angle. It should be noted that once the new bushings are installed, a flat punch should be us to flatten over two spots on the lip of
the new bushing so that it doesn't rotate in the bracket. You should see what I mean when you try to remove your old bushings, since the originals have the flatten spots.
Though you can buy new ones, I rebuilt my spring perches. The only real trick is to install the bushings rotated at the right angle. It should be noted that once the new bushings are installed, a flat punch should be us to flatten over two spots on the lip of
the new bushing so that it doesn't rotate in the bracket. You should see what I mean when you try to remove your old bushings, since the originals have the flatten spots.
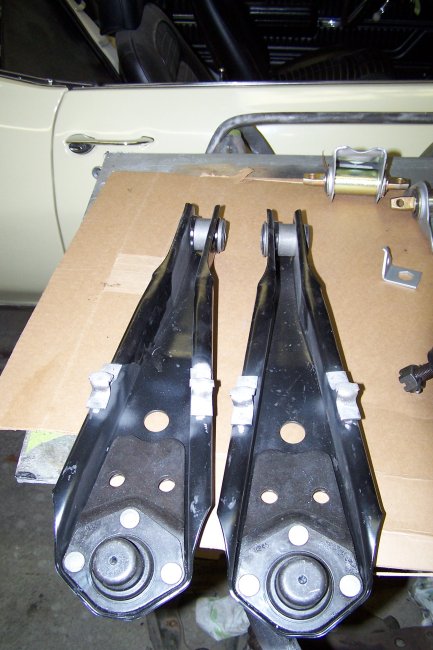 With this car I was forced to buy new upper and lower control arms. The originals just couldn't be rebuilt. Original lower control arms have two jacking tabs welded to the bottom. These are missing from the repo lower control arms.
You can use your old ones, or install a set of repos like I did here. Also, originals lower control arms were dipped in black paint. Everything was cover except for the last 6 inches on the ball joint side. To get a concours correct look, I painted the ends with
a natural looking silver paint.
With this car I was forced to buy new upper and lower control arms. The originals just couldn't be rebuilt. Original lower control arms have two jacking tabs welded to the bottom. These are missing from the repo lower control arms.
You can use your old ones, or install a set of repos like I did here. Also, originals lower control arms were dipped in black paint. Everything was cover except for the last 6 inches on the ball joint side. To get a concours correct look, I painted the ends with
a natural looking silver paint.
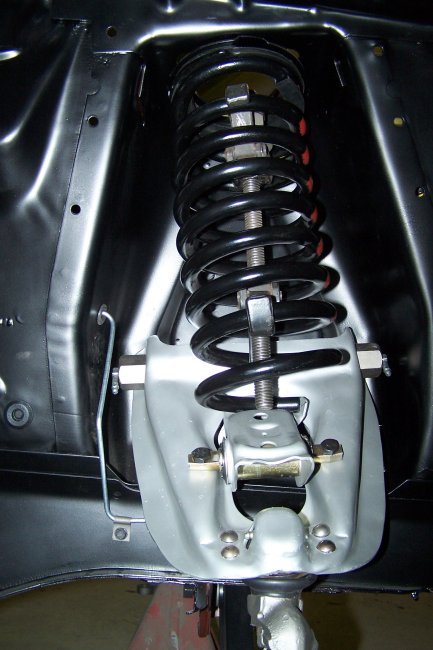
 Original upper control arms were bare steel. Ford service replacements were paint black to keep them from rusting on the shelves. I decided to paint my new ones with natural looking silver paint. In this picture you can see that I installed the spring perch. I also
reproduced the original yellow paint marking. Notice the Red nuts ? Ford originally used red dyed nuts to hold on the perch and to attach the upper control arm to the shock tower. At least on this car anyways.
Original upper control arms were bare steel. Ford service replacements were paint black to keep them from rusting on the shelves. I decided to paint my new ones with natural looking silver paint. In this picture you can see that I installed the spring perch. I also
reproduced the original yellow paint marking. Notice the Red nuts ? Ford originally used red dyed nuts to hold on the perch and to attach the upper control arm to the shock tower. At least on this car anyways.
 Here is a coil spring compressed with and internal type spring compressor. You should note how I installed it, because doing it any other way is extremely difficult. The center bolt on the spring compressor is way too long and tends to get hung up on the perch.
One thing that you can't see very well is that I used a stack of washers and nuts to make up the space needed to hold the clamps at the correct place at the top.
Here is a coil spring compressed with and internal type spring compressor. You should note how I installed it, because doing it any other way is extremely difficult. The center bolt on the spring compressor is way too long and tends to get hung up on the perch.
One thing that you can't see very well is that I used a stack of washers and nuts to make up the space needed to hold the clamps at the correct place at the top.
 Here is the right front coil spring ready to have the compressor loosened up. Notice that the markings on the spring are facing the front of the car and are barely noticeable ?
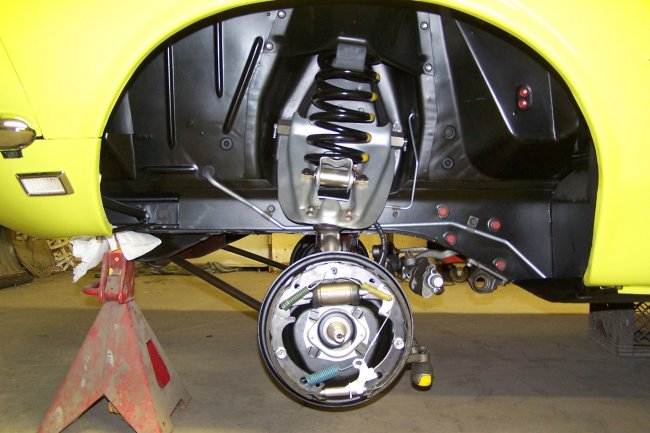 Here is the left front side all assembled, less the brake drum and wheel. You may notice that I have right angle grease fittings on the upper control arm. Since I plan on driving the car, occassionaly I will need to grease the suspension. Since these fittings can't be installed
after the upper control arms are installed (hence cars with holes in the shock towers), the decision to use them must be made before installing the control arms. Concours driven class allows the use of right angle grease fittings. A trailer car would have to have the
original factory plugs installed.
Here is the left front side all assembled, less the brake drum and wheel. You may notice that I have right angle grease fittings on the upper control arm. Since I plan on driving the car, occassionaly I will need to grease the suspension. Since these fittings can't be installed
after the upper control arms are installed (hence cars with holes in the shock towers), the decision to use them must be made before installing the control arms. Concours driven class allows the use of right angle grease fittings. A trailer car would have to have the
original factory plugs installed.
The yellow paint daub on the tierod end is what I found on the original tierod end. Some of the Mustang detailing guides state that there should be green mark on the left side and a yellow mark on the right. This is not the case. The factory used this mark probably just for orientation. The 69 chassis assembly manual shows this yellow mark on cars with power steering. It does not show a green mark at all.