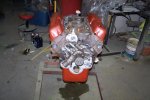
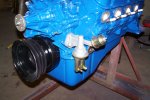
 Here is the engine I got for the car. Its an original 69 302-2v engine that came out of a 69 Mustang Fastback. I drove to Massachusetts on November, 27, 2004 to get it
and it cost me $110. I saw this engine 1 1/2 years prior when I went to buy a used 3spd transmission for my other Mustang project. It was stored outside with a plastic
covering it. It doesn't look very pretty in this picture, but it looked much prettier 1 1/2 years before. I didn't care about most of the bolt on parts, since they weren't correct
for my AC car anyways.
Here is the engine I got for the car. Its an original 69 302-2v engine that came out of a 69 Mustang Fastback. I drove to Massachusetts on November, 27, 2004 to get it
and it cost me $110. I saw this engine 1 1/2 years prior when I went to buy a used 3spd transmission for my other Mustang project. It was stored outside with a plastic
covering it. It doesn't look very pretty in this picture, but it looked much prettier 1 1/2 years before. I didn't care about most of the bolt on parts, since they weren't correct
for my AC car anyways.
|
|
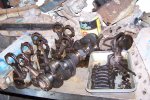
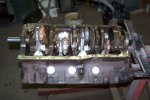
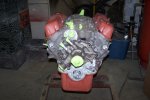
 I tore it all apart and found that I may need to have one cylinder sleeved.
|
|
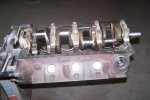
 The crank and the bearings looked pretty good.
|
|
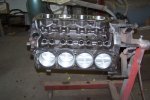
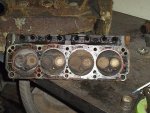 The heads looked pretty bad, but none of the valves were stuck. I was planning to replace all of the valves and guides anyways.
|
|
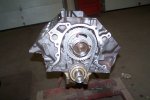
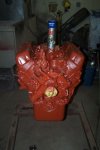
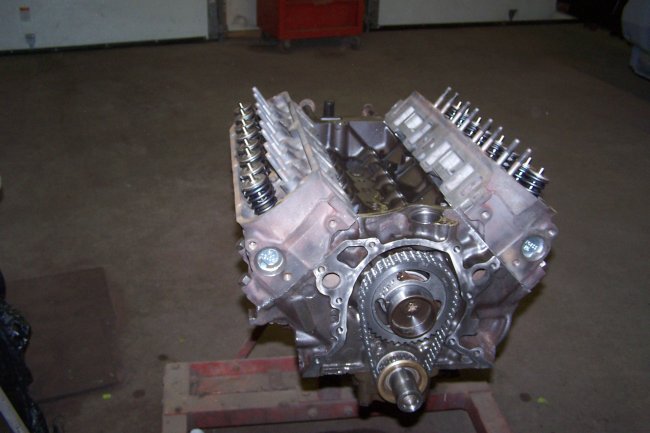
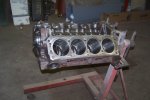 About $1200 later I got my engine back from the machine shop. One cylinder was sleeved, the block was bored 0.030, the crank was turned 0.010, the heads were planed
and rebuilt with new valve guides, seals and valves. Here's the block on my motor stand waiting to be assembled.
About $1200 later I got my engine back from the machine shop. One cylinder was sleeved, the block was bored 0.030, the crank was turned 0.010, the heads were planed
and rebuilt with new valve guides, seals and valves. Here's the block on my motor stand waiting to be assembled.
|
|
 First to go in was the crank. I used lithium grease on the bearings.
|
|
 Next went the pistons. I coated the cylinder walls with motor oil and poured oil all over the rings prior to installation. Each connecting rod was marked prior to
removal so that they could be installed in the location that they originally came out of. The connecting rods also have to be installed on the piston based on which side of
the crank they go.
Next went the pistons. I coated the cylinder walls with motor oil and poured oil all over the rings prior to installation. Each connecting rod was marked prior to
removal so that they could be installed in the location that they originally came out of. The connecting rods also have to be installed on the piston based on which side of
the crank they go.
|
|
 Here's the top view. You can see the marks on the top of the pistons that are used to mark the front off the engine. The machinest bored each cylinder to match the piston that
goes into it since there is some variability in piston diameter.
Here's the top view. You can see the marks on the top of the pistons that are used to mark the front off the engine. The machinest bored each cylinder to match the piston that
goes into it since there is some variability in piston diameter.
|
|
 The next thing to go on was cam and the timing gears. The lobes of the cam care coated with a special grease to help it break-in easier. In this picture the oil baffle is alread installed on the
end of the crank. You don't want to forget this part. It should be noted that the timing marks are aligned here. This means that the number 1 cylinder is at top dead center on its
compression stroke. If the crank is not turned, all you have to do is drop the distributor in so that it lines up with #1 and the engine should be able to be started. Usually the shaft
at the end of the oil pump needs to be rotated using a nutdriver to get the distributor to drop in all the way.
The next thing to go on was cam and the timing gears. The lobes of the cam care coated with a special grease to help it break-in easier. In this picture the oil baffle is alread installed on the
end of the crank. You don't want to forget this part. It should be noted that the timing marks are aligned here. This means that the number 1 cylinder is at top dead center on its
compression stroke. If the crank is not turned, all you have to do is drop the distributor in so that it lines up with #1 and the engine should be able to be started. Usually the shaft
at the end of the oil pump needs to be rotated using a nutdriver to get the distributor to drop in all the way.
|
|
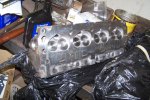 Here's what one of the heads looked like after the rebuild.
|
|
 Here they are installed. In regards to rocker arms, real early 302's were easy. You just had to torque down the bolts and measure the slop of the pushrods. If they didn't met spec you
had to replace the rods with longer or short ones. This engine didn't have the early style rocker arms. So each one had to be set using a feeler gauge.
Here they are installed. In regards to rocker arms, real early 302's were easy. You just had to torque down the bolts and measure the slop of the pushrods. If they didn't met spec you
had to replace the rods with longer or short ones. This engine didn't have the early style rocker arms. So each one had to be set using a feeler gauge.
|
|
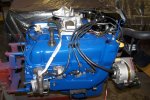
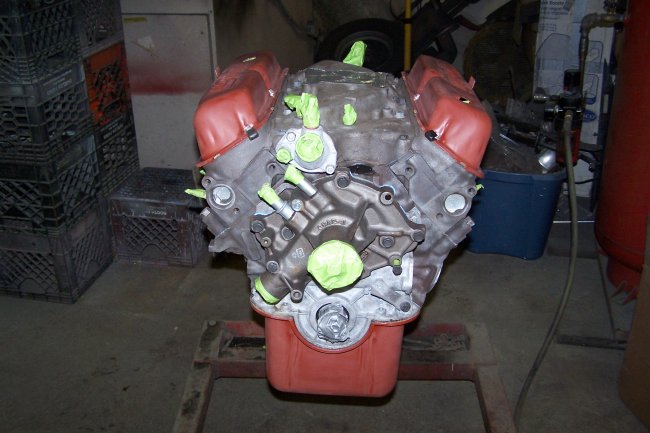
 Here's the engine with everthing installed, except the dipstick tube. The waterpump is a rebuilt original. The rear vacuum tree, the temp sending unit, the water neck and the thermo vacuum switch
are all installed prior to painting. You can see in this picture that the wire retaintes are installed on the valve covers prior to painting, which is the way the factory did it.
Here's the engine with everthing installed, except the dipstick tube. The waterpump is a rebuilt original. The rear vacuum tree, the temp sending unit, the water neck and the thermo vacuum switch
are all installed prior to painting. You can see in this picture that the wire retaintes are installed on the valve covers prior to painting, which is the way the factory did it.
|
|
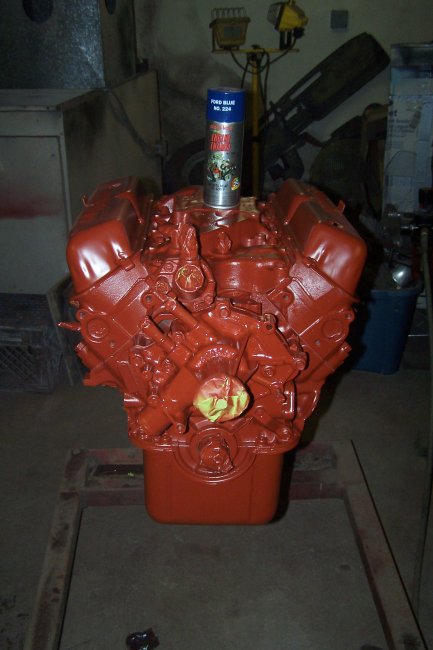
 The valve covers and oil pan were sanded prior to the painting of the engine. I wrapped the spark plugs with tape and loosely installed them. I also maked over the exhaust ports with wide tape.
|
|
 The engine was primed using DP74LF epoxy primer.
|
|
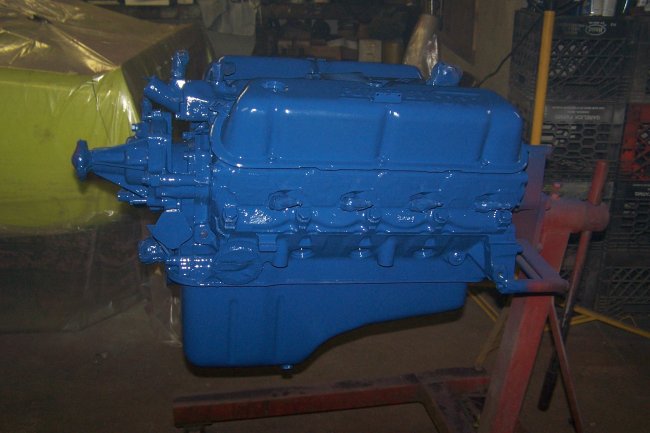
 After the primer had set for a couple hours, the engine was then painted using Plasticoat Ford #224 engine paint. It took me 4 cans to do the engine and the breather.
|
|
 I started final assembly with the harmonic balancer and crank pulley. Since this is an AC car the pulley has 3 grooves. Notice that the bolts are phoshpate coated?
|
|
 Next to go on was the fuel pump and the oil pressure sending unit. Guess what ? Nobody is selling the correct fuel pumps anymore. They are selling fuel pumps with 5/6" inlets, instead of the correct
3/8" inlet.
Next to go on was the fuel pump and the oil pressure sending unit. Guess what ? Nobody is selling the correct fuel pumps anymore. They are selling fuel pumps with 5/6" inlets, instead of the correct
3/8" inlet.
|
|
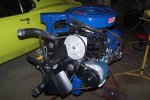
 Here it is waiting for the AC pump and pulleys to be installed. I bought all of the parts from a guy who pulled the system of his 69 Cougar, which had a 351w. It cost me $100 for everything. Unfortunately
while installing the parts on the engine I learned the the pump brackets are different for a 302. I was lucky enough to get a restored set from Classic Auto Air for $138.
Here it is waiting for the AC pump and pulleys to be installed. I bought all of the parts from a guy who pulled the system of his 69 Cougar, which had a 351w. It cost me $100 for everything. Unfortunately
while installing the parts on the engine I learned the the pump brackets are different for a 302. I was lucky enough to get a restored set from Classic Auto Air for $138.
|
|
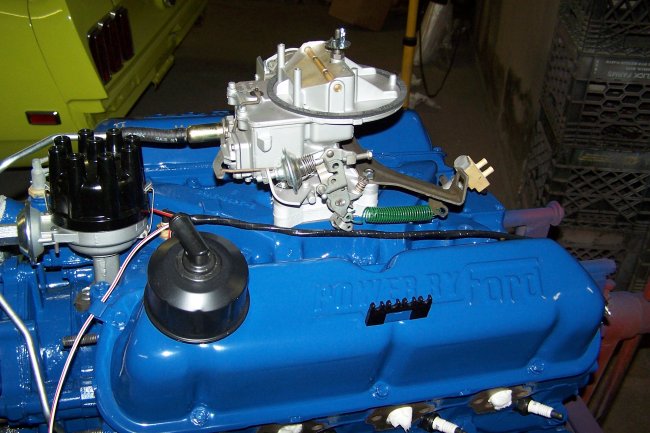
 Here is a close-up showing the accelerator bracket, return spring and rear vacuum tree. The bracket is phosphate & oil coated, the return spring is painted dark green and the vacuum tree has natural components.
|
|
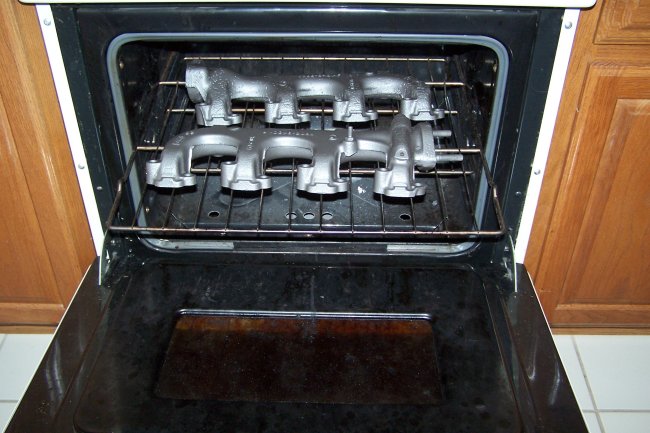
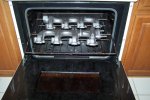 Nothing says lovin' like exhaust manifolds in the oven.
|
|
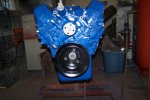
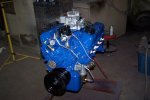
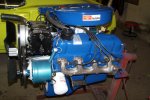
 Here is the engine all together with the breather removed to show the heat stove pipe connections. Notice the alternator ? The redish stripe with the stampings in it
first appeared on cars built in March of 1969. The alternator is a correct reproduction that I purchased from AMK Products.
Here is the engine all together with the breather removed to show the heat stove pipe connections. Notice the alternator ? The redish stripe with the stampings in it
first appeared on cars built in March of 1969. The alternator is a correct reproduction that I purchased from AMK Products.
|
|
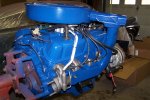
 Here is a view of the left side of the engine. Notice that the oil filter is by Motorcraft ? To be concourse correct the filter must be Autolite brand or at least be painted engine color (since Ford originally
painted the engine with the oil filter installed). Though not very clear in this picture the breather decal is a concourse correct reproduction by AMK Products. It has the correct partnumber and filter number printed
on it. Cheap repos do not have this information.
Here is a view of the left side of the engine. Notice that the oil filter is by Motorcraft ? To be concourse correct the filter must be Autolite brand or at least be painted engine color (since Ford originally
painted the engine with the oil filter installed). Though not very clear in this picture the breather decal is a concourse correct reproduction by AMK Products. It has the correct partnumber and filter number printed
on it. Cheap repos do not have this information.
|
|
 Here is a picture with the breather installed. There is no way to install it incorrectly. So Ford never put a "Front" decal on it. It is a very common mistake for restorers to put on a "Front" decal since the decal kits come
with them.
Here is a picture with the breather installed. There is no way to install it incorrectly. So Ford never put a "Front" decal on it. It is a very common mistake for restorers to put on a "Front" decal since the decal kits come
with them.
|
|
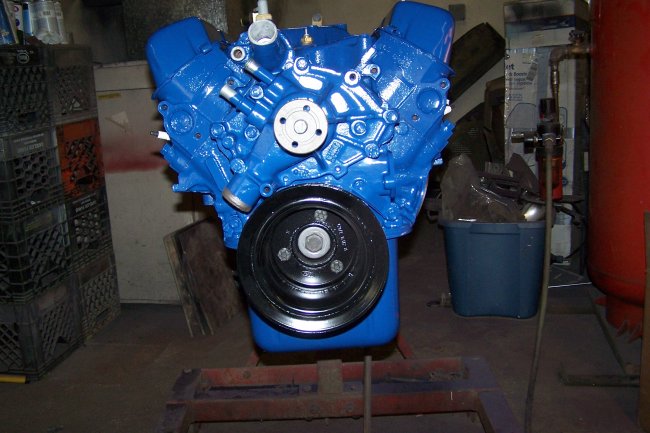
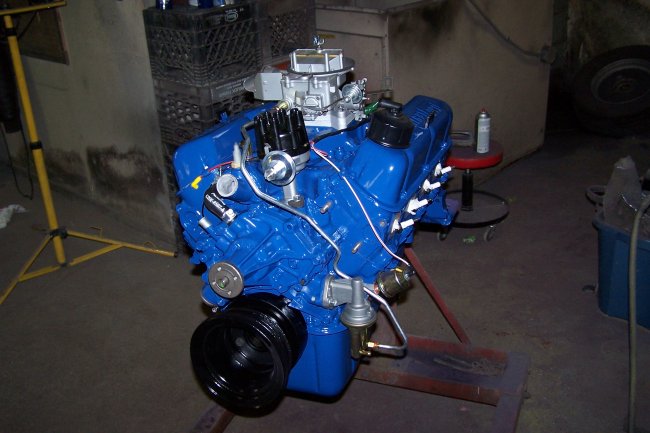
 Here's the engine all assembled and ready to be installed.
|
|
|
|
Miscellaneous
|
|
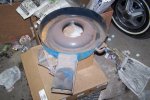 Here's the breather I got off E-bay for $20. It doesn't look pretty here, but.....
|
|
 A little sandblasting and some sanding....
|
|
 Followed by primer and paint, and it looks brand new.
|
|
 I learned alot about dipstick tubes on this project, since my original one was broken. First of all the repo places do not make the correct disptick tubes for 68/69 cars with 302's. So don't even bother buying one.
1968 and 1969 dipstick tubes are 2" longer then any other year. In this picture you can see my broken original one next to one taken from a 1970. After several attempts at having someone send me the correct one, I ended up
buying a timing cover with the dispstick installed for $63 off e-bay. I used a hammer and punch to get it to come out without breaking it.
I learned alot about dipstick tubes on this project, since my original one was broken. First of all the repo places do not make the correct disptick tubes for 68/69 cars with 302's. So don't even bother buying one.
1968 and 1969 dipstick tubes are 2" longer then any other year. In this picture you can see my broken original one next to one taken from a 1970. After several attempts at having someone send me the correct one, I ended up
buying a timing cover with the dispstick installed for $63 off e-bay. I used a hammer and punch to get it to come out without breaking it.
|
|
|
|
Installation
|
|
 The first thing that had to be done was to get the engine off the stand. I removed the carb and installed an engine pull plate in its place. I also removed the fan and fans spacer, since they would hit the radiator
support. It should be noted that I never installed the carb spacer gaskets, since they would
get damaged during the engine installation. With the engine in the air, I installed the rear engine plate and the flywheel.
The first thing that had to be done was to get the engine off the stand. I removed the carb and installed an engine pull plate in its place. I also removed the fan and fans spacer, since they would hit the radiator
support. It should be noted that I never installed the carb spacer gaskets, since they would
get damaged during the engine installation. With the engine in the air, I installed the rear engine plate and the flywheel.
|
|
 The fun part was mating the transmission to the engine. Though not shown very well in this picture, the transmission dipstick tube is a bright green, poppy green. The MCA judging rules state that the tube should be black, but from what I've see
the rule is completely wrong for 1969. Every original 1969 that I have seen with a 302 engine had a green disptick tube. I predict that the judges will give me a hard time with this.
The fun part was mating the transmission to the engine. Though not shown very well in this picture, the transmission dipstick tube is a bright green, poppy green. The MCA judging rules state that the tube should be black, but from what I've see
the rule is completely wrong for 1969. Every original 1969 that I have seen with a 302 engine had a green disptick tube. I predict that the judges will give me a hard time with this.
|
|
 Installing the engine went pretty quick with a helper, though it was a little nerve-racking. The trick is to hook the hoist to the front loop of the pull plate so that when the engine is lifted, the transmission drops way down.
I temporarily wrapped a chain around the tailshaft to hold it level. Once the engine was positioned over the engine compartment, the chain was released. Then it was a matter of gradually lowering the engine a little and then moving the engine
back a little each time. This was tricky enough with a 302. I can image how hard this would have been with a 428 big block.
Installing the engine went pretty quick with a helper, though it was a little nerve-racking. The trick is to hook the hoist to the front loop of the pull plate so that when the engine is lifted, the transmission drops way down.
I temporarily wrapped a chain around the tailshaft to hold it level. Once the engine was positioned over the engine compartment, the chain was released. Then it was a matter of gradually lowering the engine a little and then moving the engine
back a little each time. This was tricky enough with a 302. I can image how hard this would have been with a 428 big block.
|
|
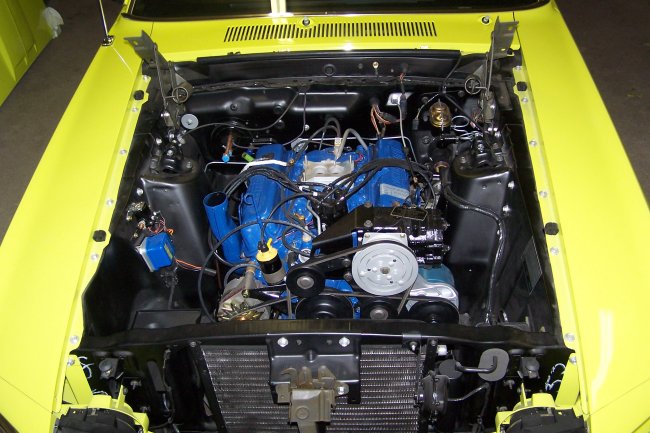
 Whew ! Here it is all bolted in with no chips dents or scratches. Now its time for the goodies.
|
|
 One fun afternoon later the engine compartment was almost completely finished.
|
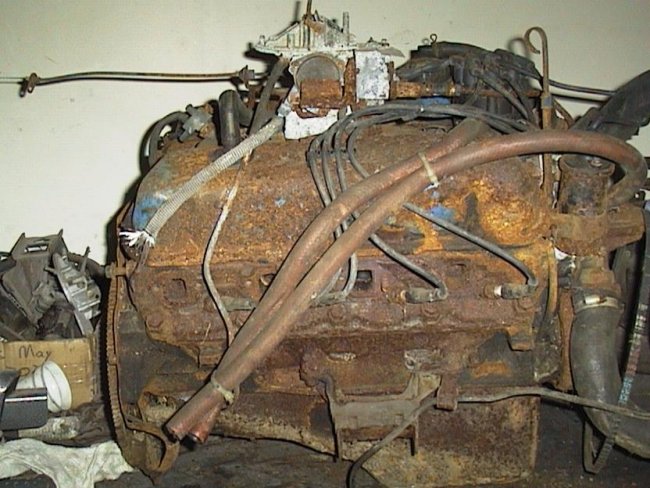 Here is the engine I got for the car. Its an original 69 302-2v engine that came out of a 69 Mustang Fastback. I drove to Massachusetts on November, 27, 2004 to get it
and it cost me $110. I saw this engine 1 1/2 years prior when I went to buy a used 3spd transmission for my other Mustang project. It was stored outside with a plastic
covering it. It doesn't look very pretty in this picture, but it looked much prettier 1 1/2 years before. I didn't care about most of the bolt on parts, since they weren't correct
for my AC car anyways.
Here is the engine I got for the car. Its an original 69 302-2v engine that came out of a 69 Mustang Fastback. I drove to Massachusetts on November, 27, 2004 to get it
and it cost me $110. I saw this engine 1 1/2 years prior when I went to buy a used 3spd transmission for my other Mustang project. It was stored outside with a plastic
covering it. It doesn't look very pretty in this picture, but it looked much prettier 1 1/2 years before. I didn't care about most of the bolt on parts, since they weren't correct
for my AC car anyways.
 I tore it all apart and found that I may need to have one cylinder sleeved.
 The crank and the bearings looked pretty good.
 The heads looked pretty bad, but none of the valves were stuck. I was planning to replace all of the valves and guides anyways.
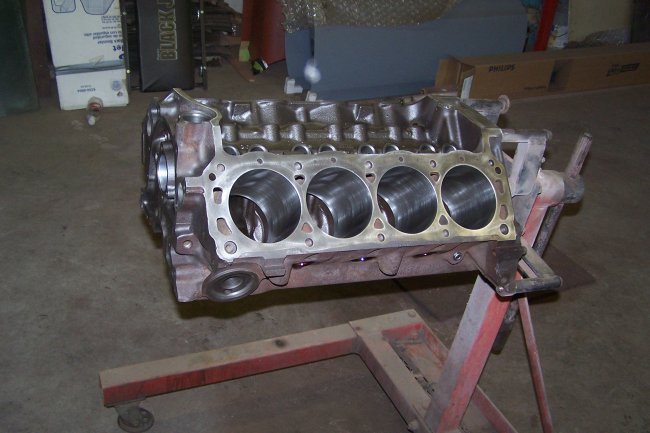 About $1200 later I got my engine back from the machine shop. One cylinder was sleeved, the block was bored 0.030, the crank was turned 0.010, the heads were planed
and rebuilt with new valve guides, seals and valves. Here's the block on my motor stand waiting to be assembled.
About $1200 later I got my engine back from the machine shop. One cylinder was sleeved, the block was bored 0.030, the crank was turned 0.010, the heads were planed
and rebuilt with new valve guides, seals and valves. Here's the block on my motor stand waiting to be assembled.
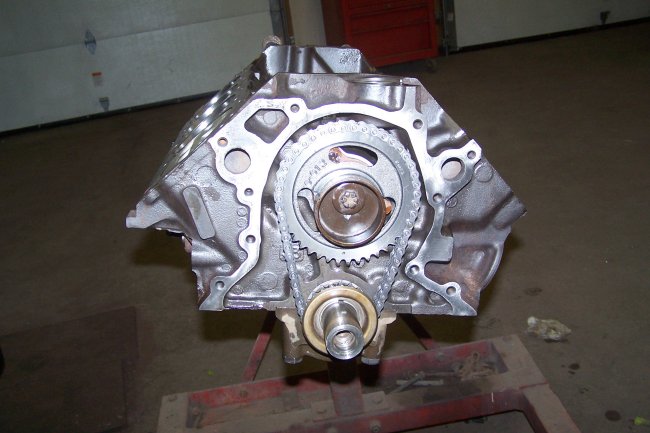
 First to go in was the crank. I used lithium grease on the bearings.
 Next went the pistons. I coated the cylinder walls with motor oil and poured oil all over the rings prior to installation. Each connecting rod was marked prior to
removal so that they could be installed in the location that they originally came out of. The connecting rods also have to be installed on the piston based on which side of
the crank they go.
Next went the pistons. I coated the cylinder walls with motor oil and poured oil all over the rings prior to installation. Each connecting rod was marked prior to
removal so that they could be installed in the location that they originally came out of. The connecting rods also have to be installed on the piston based on which side of
the crank they go.
 Here's the top view. You can see the marks on the top of the pistons that are used to mark the front off the engine. The machinest bored each cylinder to match the piston that
goes into it since there is some variability in piston diameter.
Here's the top view. You can see the marks on the top of the pistons that are used to mark the front off the engine. The machinest bored each cylinder to match the piston that
goes into it since there is some variability in piston diameter.
 The next thing to go on was cam and the timing gears. The lobes of the cam care coated with a special grease to help it break-in easier. In this picture the oil baffle is alread installed on the
end of the crank. You don't want to forget this part. It should be noted that the timing marks are aligned here. This means that the number 1 cylinder is at top dead center on its
compression stroke. If the crank is not turned, all you have to do is drop the distributor in so that it lines up with #1 and the engine should be able to be started. Usually the shaft
at the end of the oil pump needs to be rotated using a nutdriver to get the distributor to drop in all the way.
The next thing to go on was cam and the timing gears. The lobes of the cam care coated with a special grease to help it break-in easier. In this picture the oil baffle is alread installed on the
end of the crank. You don't want to forget this part. It should be noted that the timing marks are aligned here. This means that the number 1 cylinder is at top dead center on its
compression stroke. If the crank is not turned, all you have to do is drop the distributor in so that it lines up with #1 and the engine should be able to be started. Usually the shaft
at the end of the oil pump needs to be rotated using a nutdriver to get the distributor to drop in all the way.
 Here's what one of the heads looked like after the rebuild.
 Here they are installed. In regards to rocker arms, real early 302's were easy. You just had to torque down the bolts and measure the slop of the pushrods. If they didn't met spec you
had to replace the rods with longer or short ones. This engine didn't have the early style rocker arms. So each one had to be set using a feeler gauge.
Here they are installed. In regards to rocker arms, real early 302's were easy. You just had to torque down the bolts and measure the slop of the pushrods. If they didn't met spec you
had to replace the rods with longer or short ones. This engine didn't have the early style rocker arms. So each one had to be set using a feeler gauge.
 Here's the engine with everthing installed, except the dipstick tube. The waterpump is a rebuilt original. The rear vacuum tree, the temp sending unit, the water neck and the thermo vacuum switch
are all installed prior to painting. You can see in this picture that the wire retaintes are installed on the valve covers prior to painting, which is the way the factory did it.
Here's the engine with everthing installed, except the dipstick tube. The waterpump is a rebuilt original. The rear vacuum tree, the temp sending unit, the water neck and the thermo vacuum switch
are all installed prior to painting. You can see in this picture that the wire retaintes are installed on the valve covers prior to painting, which is the way the factory did it.
 The valve covers and oil pan were sanded prior to the painting of the engine. I wrapped the spark plugs with tape and loosely installed them. I also maked over the exhaust ports with wide tape.
 The engine was primed using DP74LF epoxy primer.
 After the primer had set for a couple hours, the engine was then painted using Plasticoat Ford #224 engine paint. It took me 4 cans to do the engine and the breather.
 I started final assembly with the harmonic balancer and crank pulley. Since this is an AC car the pulley has 3 grooves. Notice that the bolts are phoshpate coated?
 Next to go on was the fuel pump and the oil pressure sending unit. Guess what ? Nobody is selling the correct fuel pumps anymore. They are selling fuel pumps with 5/6" inlets, instead of the correct
3/8" inlet.
Next to go on was the fuel pump and the oil pressure sending unit. Guess what ? Nobody is selling the correct fuel pumps anymore. They are selling fuel pumps with 5/6" inlets, instead of the correct
3/8" inlet.
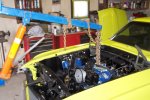
 Here it is waiting for the AC pump and pulleys to be installed. I bought all of the parts from a guy who pulled the system of his 69 Cougar, which had a 351w. It cost me $100 for everything. Unfortunately
while installing the parts on the engine I learned the the pump brackets are different for a 302. I was lucky enough to get a restored set from Classic Auto Air for $138.
Here it is waiting for the AC pump and pulleys to be installed. I bought all of the parts from a guy who pulled the system of his 69 Cougar, which had a 351w. It cost me $100 for everything. Unfortunately
while installing the parts on the engine I learned the the pump brackets are different for a 302. I was lucky enough to get a restored set from Classic Auto Air for $138.
 Here is a close-up showing the accelerator bracket, return spring and rear vacuum tree. The bracket is phosphate & oil coated, the return spring is painted dark green and the vacuum tree has natural components.
 Nothing says lovin' like exhaust manifolds in the oven.
 Here is the engine all together with the breather removed to show the heat stove pipe connections. Notice the alternator ? The redish stripe with the stampings in it
first appeared on cars built in March of 1969. The alternator is a correct reproduction that I purchased from AMK Products.
Here is the engine all together with the breather removed to show the heat stove pipe connections. Notice the alternator ? The redish stripe with the stampings in it
first appeared on cars built in March of 1969. The alternator is a correct reproduction that I purchased from AMK Products.
 Here is a view of the left side of the engine. Notice that the oil filter is by Motorcraft ? To be concourse correct the filter must be Autolite brand or at least be painted engine color (since Ford originally
painted the engine with the oil filter installed). Though not very clear in this picture the breather decal is a concourse correct reproduction by AMK Products. It has the correct partnumber and filter number printed
on it. Cheap repos do not have this information.
Here is a view of the left side of the engine. Notice that the oil filter is by Motorcraft ? To be concourse correct the filter must be Autolite brand or at least be painted engine color (since Ford originally
painted the engine with the oil filter installed). Though not very clear in this picture the breather decal is a concourse correct reproduction by AMK Products. It has the correct partnumber and filter number printed
on it. Cheap repos do not have this information.
 Here is a picture with the breather installed. There is no way to install it incorrectly. So Ford never put a "Front" decal on it. It is a very common mistake for restorers to put on a "Front" decal since the decal kits come
with them.
Here is a picture with the breather installed. There is no way to install it incorrectly. So Ford never put a "Front" decal on it. It is a very common mistake for restorers to put on a "Front" decal since the decal kits come
with them.
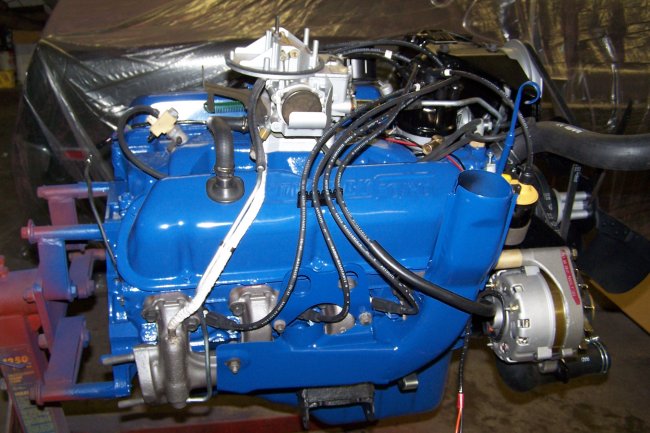
 Here's the engine all assembled and ready to be installed.
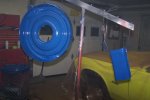
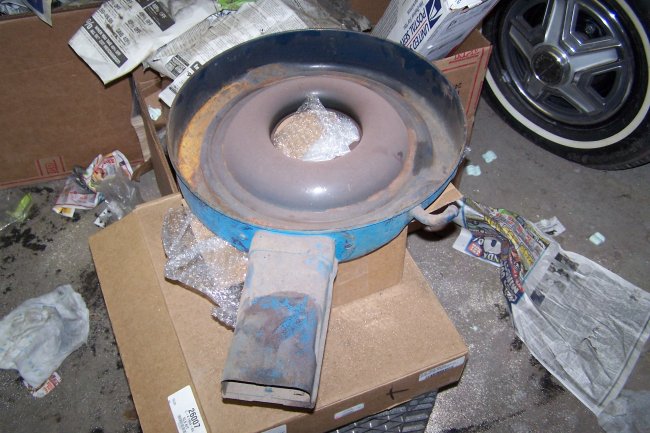 Here's the breather I got off E-bay for $20. It doesn't look pretty here, but.....
 A little sandblasting and some sanding....
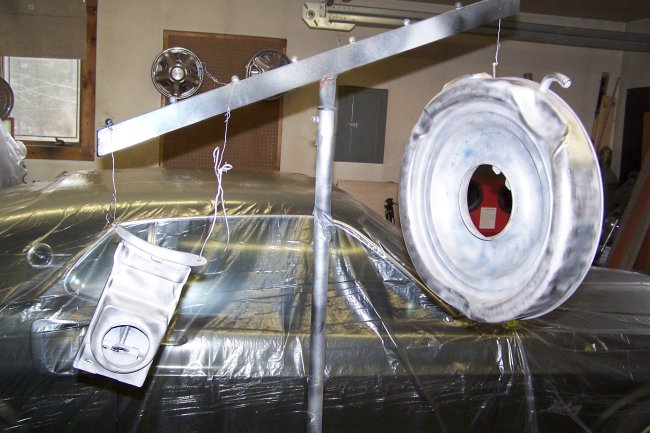
 Followed by primer and paint, and it looks brand new.
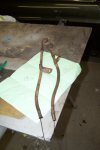
 I learned alot about dipstick tubes on this project, since my original one was broken. First of all the repo places do not make the correct disptick tubes for 68/69 cars with 302's. So don't even bother buying one.
1968 and 1969 dipstick tubes are 2" longer then any other year. In this picture you can see my broken original one next to one taken from a 1970. After several attempts at having someone send me the correct one, I ended up
buying a timing cover with the dispstick installed for $63 off e-bay. I used a hammer and punch to get it to come out without breaking it.
I learned alot about dipstick tubes on this project, since my original one was broken. First of all the repo places do not make the correct disptick tubes for 68/69 cars with 302's. So don't even bother buying one.
1968 and 1969 dipstick tubes are 2" longer then any other year. In this picture you can see my broken original one next to one taken from a 1970. After several attempts at having someone send me the correct one, I ended up
buying a timing cover with the dispstick installed for $63 off e-bay. I used a hammer and punch to get it to come out without breaking it.
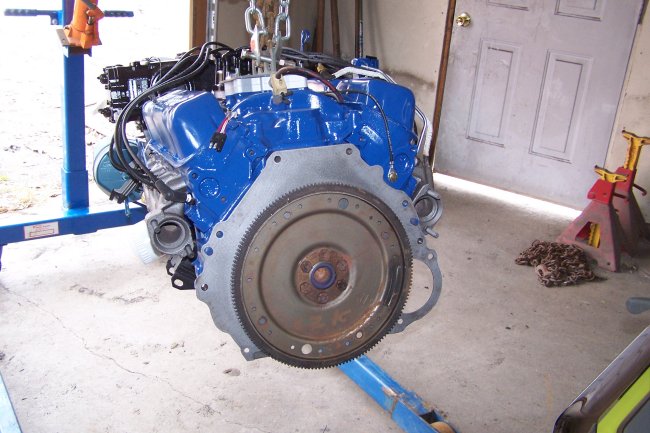 The first thing that had to be done was to get the engine off the stand. I removed the carb and installed an engine pull plate in its place. I also removed the fan and fans spacer, since they would hit the radiator
support. It should be noted that I never installed the carb spacer gaskets, since they would
get damaged during the engine installation. With the engine in the air, I installed the rear engine plate and the flywheel.
The first thing that had to be done was to get the engine off the stand. I removed the carb and installed an engine pull plate in its place. I also removed the fan and fans spacer, since they would hit the radiator
support. It should be noted that I never installed the carb spacer gaskets, since they would
get damaged during the engine installation. With the engine in the air, I installed the rear engine plate and the flywheel.
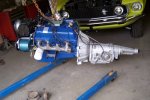
 The fun part was mating the transmission to the engine. Though not shown very well in this picture, the transmission dipstick tube is a bright green, poppy green. The MCA judging rules state that the tube should be black, but from what I've see
the rule is completely wrong for 1969. Every original 1969 that I have seen with a 302 engine had a green disptick tube. I predict that the judges will give me a hard time with this.
The fun part was mating the transmission to the engine. Though not shown very well in this picture, the transmission dipstick tube is a bright green, poppy green. The MCA judging rules state that the tube should be black, but from what I've see
the rule is completely wrong for 1969. Every original 1969 that I have seen with a 302 engine had a green disptick tube. I predict that the judges will give me a hard time with this.
 Installing the engine went pretty quick with a helper, though it was a little nerve-racking. The trick is to hook the hoist to the front loop of the pull plate so that when the engine is lifted, the transmission drops way down.
I temporarily wrapped a chain around the tailshaft to hold it level. Once the engine was positioned over the engine compartment, the chain was released. Then it was a matter of gradually lowering the engine a little and then moving the engine
back a little each time. This was tricky enough with a 302. I can image how hard this would have been with a 428 big block.
Installing the engine went pretty quick with a helper, though it was a little nerve-racking. The trick is to hook the hoist to the front loop of the pull plate so that when the engine is lifted, the transmission drops way down.
I temporarily wrapped a chain around the tailshaft to hold it level. Once the engine was positioned over the engine compartment, the chain was released. Then it was a matter of gradually lowering the engine a little and then moving the engine
back a little each time. This was tricky enough with a 302. I can image how hard this would have been with a 428 big block.
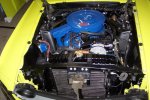
 Whew ! Here it is all bolted in with no chips dents or scratches. Now its time for the goodies.
 One fun afternoon later the engine compartment was almost completely finished.