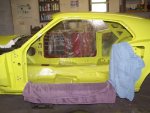
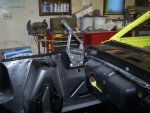
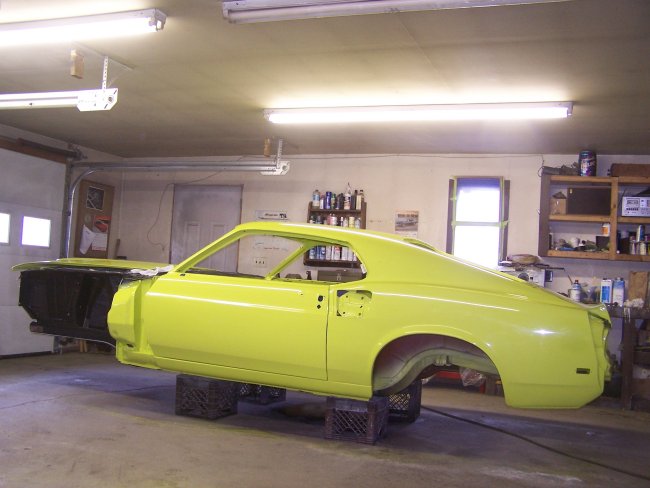
 I start assembly with the doors. Even though the paint is cured, it still can be chipped. I use towels to protect the paint. On the bottom of the doors
are metal channels that retain the weather seal. Its important to make sure that the channels do not scrape the paint off the top of the sills. Folding a towel
in half gave me the correct spacing. I also installed the door stops/bumpers to help set the door.
I start assembly with the doors. Even though the paint is cured, it still can be chipped. I use towels to protect the paint. On the bottom of the doors
are metal channels that retain the weather seal. Its important to make sure that the channels do not scrape the paint off the top of the sills. Folding a towel
in half gave me the correct spacing. I also installed the door stops/bumpers to help set the door.
|
|
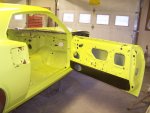
 Here is the drivers door installed. I used reference pictures and the measurements that I took when I test fitted the panels, prior to painting, to set the gaps on the door.
since the hinges were already bolted to the door prior to painting, it was just a matter of getting the gaps at the bottom and at the door post back to the way I had them before.
Note: This only worked because I was extra careful when I test fitted the panels.
Here is the drivers door installed. I used reference pictures and the measurements that I took when I test fitted the panels, prior to painting, to set the gaps on the door.
since the hinges were already bolted to the door prior to painting, it was just a matter of getting the gaps at the bottom and at the door post back to the way I had them before.
Note: This only worked because I was extra careful when I test fitted the panels.
|
|
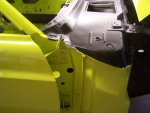
 The right side was done the same as the left. It should be noted that the doors will sag a little once all of the hardware is installed. So you its important to either align the
doors with the hardware installed or align them a little high at the rear.
The right side was done the same as the left. It should be noted that the doors will sag a little once all of the hardware is installed. So you its important to either align the
doors with the hardware installed or align them a little high at the rear.
|
|
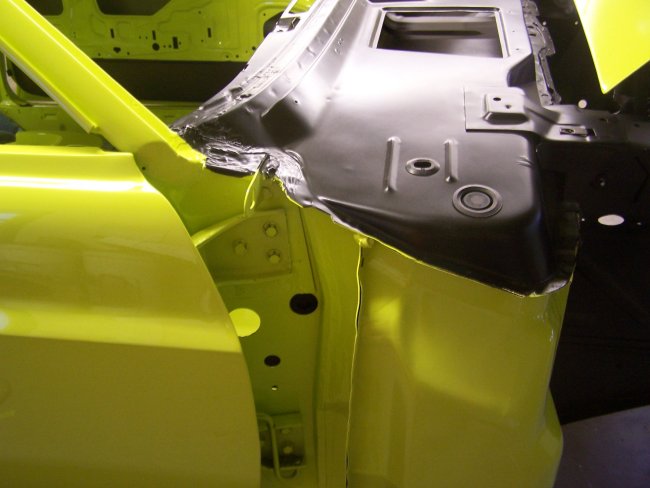
 Next came the fenders and hood. The first thing that needed to be done was the installation of the cowl and hinge pillar plugs. New plugs are identical to the original parts and
are pretty cheap. $20 for the whole car.
Next came the fenders and hood. The first thing that needed to be done was the installation of the cowl and hinge pillar plugs. New plugs are identical to the original parts and
are pretty cheap. $20 for the whole car.
|
|
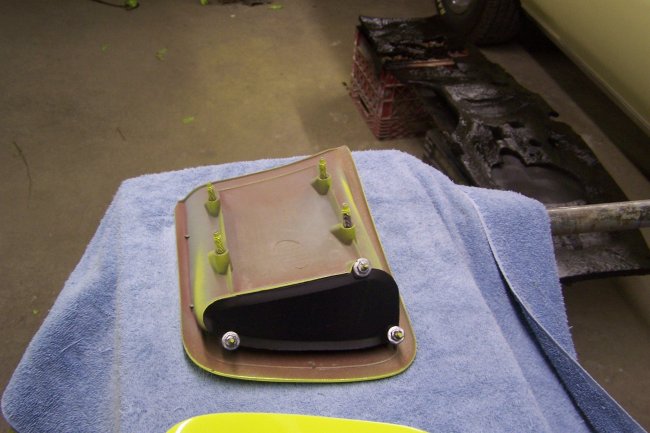
 The front fenders are bolted to the rocker panels using special clips. In this picture you can see the rectangular hole where the clips go.
|
|
 Here is a clip installed.
|
|
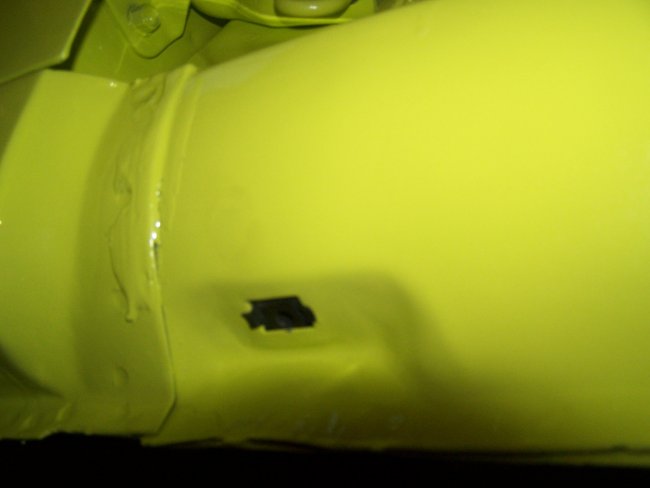
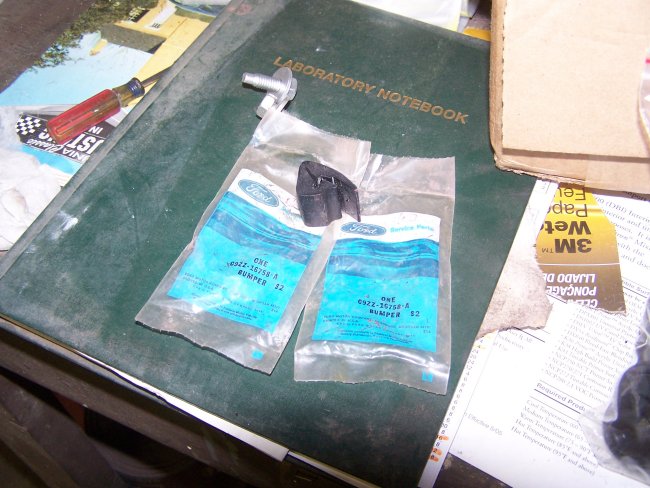
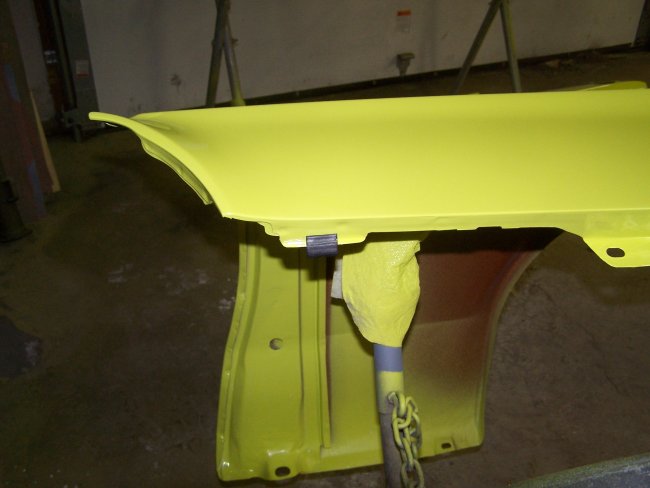
 Ford put these rubber bumpers on the tops of the fenders for the upper valance panel to rest on. They tended to fall off since they were not held on very well.
|
|
 Here's where they go. I used a dab of black weatherstrip adhesive to keep them from falling off. Notice the paint on back side of the fender ? This is pretty much how Ford did it.
|
|
 The restored hood hinges were also installed. They should have a grayish appearance since they were originally coated with phosphate and oil. Paint can not be used to
reproduce this finish. A couple methods for the do-it-yourselfer is to sandblast and coat them with gun blueing or use a home parkerizing kit. For the best results you should
have them sent out to a plater. I used a parkerizing kit. Note: Hood hinges are require periodic maintenance on a show car. They need periodic coatings of oil (Cosmoline or WD40)
to keep them from rusting. The same goes for the hood latch.
The restored hood hinges were also installed. They should have a grayish appearance since they were originally coated with phosphate and oil. Paint can not be used to
reproduce this finish. A couple methods for the do-it-yourselfer is to sandblast and coat them with gun blueing or use a home parkerizing kit. For the best results you should
have them sent out to a plater. I used a parkerizing kit. Note: Hood hinges are require periodic maintenance on a show car. They need periodic coatings of oil (Cosmoline or WD40)
to keep them from rusting. The same goes for the hood latch.
|
|
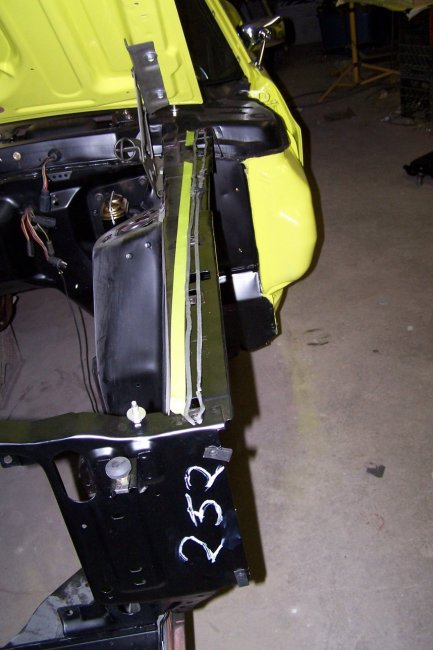
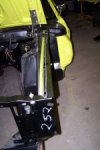 Prior to installing the fenders I reproduced the original factory markings using a white Markel Paint Stick. In this case its the number '252' which I found durign the taredown. 252 represents
the rotation number which would have appeared on the factory buildsheet had I found one. Also Prior to installing the front fenders I placed two rows of strip caulking across the tops on the inner fenders.
Ford did this to seal between the inner fenders and the fenders. If you omit the sealer the tops of the fenders will warp in a little above the shock towers.
Prior to installing the fenders I reproduced the original factory markings using a white Markel Paint Stick. In this case its the number '252' which I found durign the taredown. 252 represents
the rotation number which would have appeared on the factory buildsheet had I found one. Also Prior to installing the front fenders I placed two rows of strip caulking across the tops on the inner fenders.
Ford did this to seal between the inner fenders and the fenders. If you omit the sealer the tops of the fenders will warp in a little above the shock towers.
|
|
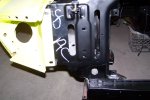 Here's I picture during the fitting of the right fender. You can see the other factory markings that were reproduced. 'AC' does infact mean Air Conditioning, However, I have yet to identify what '8'
really means. There was also a '7' written on top of the right inner fender at the shock tower, which can not be seen once the fender is installed. I have seen several examples of numbers written in this
area on several cars that were built in Metuchen at the same time as my car. Perhaps the numbers were used to identify the drying racks where the front end sheetmetal was located. Either way, you should keep
in mind that these markings are specific to this car only.
Here's I picture during the fitting of the right fender. You can see the other factory markings that were reproduced. 'AC' does infact mean Air Conditioning, However, I have yet to identify what '8'
really means. There was also a '7' written on top of the right inner fender at the shock tower, which can not be seen once the fender is installed. I have seen several examples of numbers written in this
area on several cars that were built in Metuchen at the same time as my car. Perhaps the numbers were used to identify the drying racks where the front end sheetmetal was located. Either way, you should keep
in mind that these markings are specific to this car only.
|
|
 Here is the fenders and hood installed. Every time I install a hood it seems that its high at the back. The easiest way to fix this is to loosen the hood hinges and have a friend
lift up the front of the hood as high as it could go. Then tighen the hinge bolts.
Here is the fenders and hood installed. Every time I install a hood it seems that its high at the back. The easiest way to fix this is to loosen the hood hinges and have a friend
lift up the front of the hood as high as it could go. Then tighen the hinge bolts.
|
|
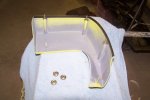
 Here is one of the side scoops. The insert was bead blasted and painted semi-flat black prior to being installed. I used an NOS side scoop to use as a reference and found that Krylon 1613 is an exact match for the paint. People
commonly use Krylon 1613 for other parts including the engine compartment, but for the most part its too flat.
Here is one of the side scoops. The insert was bead blasted and painted semi-flat black prior to being installed. I used an NOS side scoop to use as a reference and found that Krylon 1613 is an exact match for the paint. People
commonly use Krylon 1613 for other parts including the engine compartment, but for the most part its too flat.
|
|
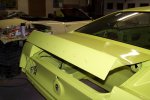
 Here is installed. Its one of my favorite features of 69 Mustangs. All 69's had them except for the Boss302's and of course the Shelbys which had functional scoops.
|
|
 Here is one of the rear quarter extensions. The gasket and hardware is new. When the new gaskets come they are too long, so you have to trim them. Also you have to cut a little V shaped notch on the inside
portion of the gasket so that it can follow the 90 degree bend in the channel, which is located at the 2nd mounting stud.
Here is one of the rear quarter extensions. The gasket and hardware is new. When the new gaskets come they are too long, so you have to trim them. Also you have to cut a little V shaped notch on the inside
portion of the gasket so that it can follow the 90 degree bend in the channel, which is located at the 2nd mounting stud.
|
|
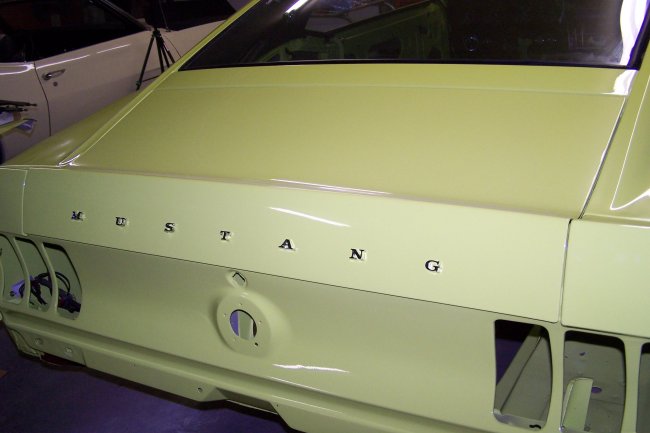
 The trunklid and the rear quarter extensions are installed at the same since they have to be aligned together. In this picture the alignment has been completed and I'm getting ready to install the trunk MUSTANG letters.
|
|
 Here are the MUSTANG letters installed. I had a little trouble with the 'U' but the rest were fine. The letters were made by Scott Drake. They come with the clips and they only Cost $10.
|
|
 Here is the back side of the hood scoop. The fasteners are all new. The light housings were taken apart and cleaned. The outside of the housings where bead blasted and painted with Matte Nickle Rustoleum.
A note about hardware: I've seen several different variations of hardware on the back sides of the scoops. On some scoops I've seen selftapping phillip screws that hold the lights in. On this one brass inserts were
pressed in the fiberglass and hex machine screws were used. Also on some I've seen the same phillip screws holding the grill in place while this one had very large flatheaded phillip screws.
Here is the back side of the hood scoop. The fasteners are all new. The light housings were taken apart and cleaned. The outside of the housings where bead blasted and painted with Matte Nickle Rustoleum.
A note about hardware: I've seen several different variations of hardware on the back sides of the scoops. On some scoops I've seen selftapping phillip screws that hold the lights in. On this one brass inserts were
pressed in the fiberglass and hex machine screws were used. Also on some I've seen the same phillip screws holding the grill in place while this one had very large flatheaded phillip screws.
|
|
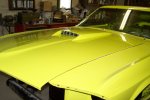 Here is a picture of the scoop after installation. Though any 1969 Mustang could be ordered with one, all Limited Edition Mustangs came with them. Note: Ford only put emblems on the hood scoop of cars
with 351 engines or larger displacement. Since this car was originally equiped with a 302 it did not have scoop emblems.
Here is a picture of the scoop after installation. Though any 1969 Mustang could be ordered with one, all Limited Edition Mustangs came with them. Note: Ford only put emblems on the hood scoop of cars
with 351 engines or larger displacement. Since this car was originally equiped with a 302 it did not have scoop emblems.
|
|
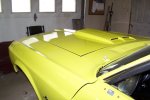 Here is a rear view of the hood scoop showing the directional indicators. Note: The upper valance panel is not bolted in place in this picture so the gaps aren't correct yet.
|
|
|
Normally the front fender extensions would be installed along with the rest of the nose. However, I'm waiting for a deadbeat e-bay seller to send me the NOS thin grill
mouldings he owes me. They have to be installed before the fender extensions can be mounted to the fenders. So far six weeks have gone by and no parts. What pisses me off
about e-bay is that sellers can get a way with a lot. They can sell you junk or never send you anything. UPDATE (9/21/06): My thin grill mouldings finally came in 7 weeks
after I paid for them.
|
 I start assembly with the doors. Even though the paint is cured, it still can be chipped. I use towels to protect the paint. On the bottom of the doors
are metal channels that retain the weather seal. Its important to make sure that the channels do not scrape the paint off the top of the sills. Folding a towel
in half gave me the correct spacing. I also installed the door stops/bumpers to help set the door.
I start assembly with the doors. Even though the paint is cured, it still can be chipped. I use towels to protect the paint. On the bottom of the doors
are metal channels that retain the weather seal. Its important to make sure that the channels do not scrape the paint off the top of the sills. Folding a towel
in half gave me the correct spacing. I also installed the door stops/bumpers to help set the door.
 Here is the drivers door installed. I used reference pictures and the measurements that I took when I test fitted the panels, prior to painting, to set the gaps on the door.
since the hinges were already bolted to the door prior to painting, it was just a matter of getting the gaps at the bottom and at the door post back to the way I had them before.
Note: This only worked because I was extra careful when I test fitted the panels.
Here is the drivers door installed. I used reference pictures and the measurements that I took when I test fitted the panels, prior to painting, to set the gaps on the door.
since the hinges were already bolted to the door prior to painting, it was just a matter of getting the gaps at the bottom and at the door post back to the way I had them before.
Note: This only worked because I was extra careful when I test fitted the panels.
 The right side was done the same as the left. It should be noted that the doors will sag a little once all of the hardware is installed. So you its important to either align the
doors with the hardware installed or align them a little high at the rear.
The right side was done the same as the left. It should be noted that the doors will sag a little once all of the hardware is installed. So you its important to either align the
doors with the hardware installed or align them a little high at the rear.
 Next came the fenders and hood. The first thing that needed to be done was the installation of the cowl and hinge pillar plugs. New plugs are identical to the original parts and
are pretty cheap. $20 for the whole car.
Next came the fenders and hood. The first thing that needed to be done was the installation of the cowl and hinge pillar plugs. New plugs are identical to the original parts and
are pretty cheap. $20 for the whole car.
 The front fenders are bolted to the rocker panels using special clips. In this picture you can see the rectangular hole where the clips go.
 Here is a clip installed.
 Ford put these rubber bumpers on the tops of the fenders for the upper valance panel to rest on. They tended to fall off since they were not held on very well.
 Here's where they go. I used a dab of black weatherstrip adhesive to keep them from falling off. Notice the paint on back side of the fender ? This is pretty much how Ford did it.
 The restored hood hinges were also installed. They should have a grayish appearance since they were originally coated with phosphate and oil. Paint can not be used to
reproduce this finish. A couple methods for the do-it-yourselfer is to sandblast and coat them with gun blueing or use a home parkerizing kit. For the best results you should
have them sent out to a plater. I used a parkerizing kit. Note: Hood hinges are require periodic maintenance on a show car. They need periodic coatings of oil (Cosmoline or WD40)
to keep them from rusting. The same goes for the hood latch.
The restored hood hinges were also installed. They should have a grayish appearance since they were originally coated with phosphate and oil. Paint can not be used to
reproduce this finish. A couple methods for the do-it-yourselfer is to sandblast and coat them with gun blueing or use a home parkerizing kit. For the best results you should
have them sent out to a plater. I used a parkerizing kit. Note: Hood hinges are require periodic maintenance on a show car. They need periodic coatings of oil (Cosmoline or WD40)
to keep them from rusting. The same goes for the hood latch.
 Prior to installing the fenders I reproduced the original factory markings using a white Markel Paint Stick. In this case its the number '252' which I found durign the taredown. 252 represents
the rotation number which would have appeared on the factory buildsheet had I found one. Also Prior to installing the front fenders I placed two rows of strip caulking across the tops on the inner fenders.
Ford did this to seal between the inner fenders and the fenders. If you omit the sealer the tops of the fenders will warp in a little above the shock towers.
Prior to installing the fenders I reproduced the original factory markings using a white Markel Paint Stick. In this case its the number '252' which I found durign the taredown. 252 represents
the rotation number which would have appeared on the factory buildsheet had I found one. Also Prior to installing the front fenders I placed two rows of strip caulking across the tops on the inner fenders.
Ford did this to seal between the inner fenders and the fenders. If you omit the sealer the tops of the fenders will warp in a little above the shock towers.
 Here's I picture during the fitting of the right fender. You can see the other factory markings that were reproduced. 'AC' does infact mean Air Conditioning, However, I have yet to identify what '8'
really means. There was also a '7' written on top of the right inner fender at the shock tower, which can not be seen once the fender is installed. I have seen several examples of numbers written in this
area on several cars that were built in Metuchen at the same time as my car. Perhaps the numbers were used to identify the drying racks where the front end sheetmetal was located. Either way, you should keep
in mind that these markings are specific to this car only.
Here's I picture during the fitting of the right fender. You can see the other factory markings that were reproduced. 'AC' does infact mean Air Conditioning, However, I have yet to identify what '8'
really means. There was also a '7' written on top of the right inner fender at the shock tower, which can not be seen once the fender is installed. I have seen several examples of numbers written in this
area on several cars that were built in Metuchen at the same time as my car. Perhaps the numbers were used to identify the drying racks where the front end sheetmetal was located. Either way, you should keep
in mind that these markings are specific to this car only.
 Here is the fenders and hood installed. Every time I install a hood it seems that its high at the back. The easiest way to fix this is to loosen the hood hinges and have a friend
lift up the front of the hood as high as it could go. Then tighen the hinge bolts.
Here is the fenders and hood installed. Every time I install a hood it seems that its high at the back. The easiest way to fix this is to loosen the hood hinges and have a friend
lift up the front of the hood as high as it could go. Then tighen the hinge bolts.
 Here is one of the side scoops. The insert was bead blasted and painted semi-flat black prior to being installed. I used an NOS side scoop to use as a reference and found that Krylon 1613 is an exact match for the paint. People
commonly use Krylon 1613 for other parts including the engine compartment, but for the most part its too flat.
Here is one of the side scoops. The insert was bead blasted and painted semi-flat black prior to being installed. I used an NOS side scoop to use as a reference and found that Krylon 1613 is an exact match for the paint. People
commonly use Krylon 1613 for other parts including the engine compartment, but for the most part its too flat.
 Here is installed. Its one of my favorite features of 69 Mustangs. All 69's had them except for the Boss302's and of course the Shelbys which had functional scoops.
 Here is one of the rear quarter extensions. The gasket and hardware is new. When the new gaskets come they are too long, so you have to trim them. Also you have to cut a little V shaped notch on the inside
portion of the gasket so that it can follow the 90 degree bend in the channel, which is located at the 2nd mounting stud.
Here is one of the rear quarter extensions. The gasket and hardware is new. When the new gaskets come they are too long, so you have to trim them. Also you have to cut a little V shaped notch on the inside
portion of the gasket so that it can follow the 90 degree bend in the channel, which is located at the 2nd mounting stud.
 The trunklid and the rear quarter extensions are installed at the same since they have to be aligned together. In this picture the alignment has been completed and I'm getting ready to install the trunk MUSTANG letters.
 Here are the MUSTANG letters installed. I had a little trouble with the 'U' but the rest were fine. The letters were made by Scott Drake. They come with the clips and they only Cost $10.
 Here is the back side of the hood scoop. The fasteners are all new. The light housings were taken apart and cleaned. The outside of the housings where bead blasted and painted with Matte Nickle Rustoleum.
A note about hardware: I've seen several different variations of hardware on the back sides of the scoops. On some scoops I've seen selftapping phillip screws that hold the lights in. On this one brass inserts were
pressed in the fiberglass and hex machine screws were used. Also on some I've seen the same phillip screws holding the grill in place while this one had very large flatheaded phillip screws.
Here is the back side of the hood scoop. The fasteners are all new. The light housings were taken apart and cleaned. The outside of the housings where bead blasted and painted with Matte Nickle Rustoleum.
A note about hardware: I've seen several different variations of hardware on the back sides of the scoops. On some scoops I've seen selftapping phillip screws that hold the lights in. On this one brass inserts were
pressed in the fiberglass and hex machine screws were used. Also on some I've seen the same phillip screws holding the grill in place while this one had very large flatheaded phillip screws.
 Here is a picture of the scoop after installation. Though any 1969 Mustang could be ordered with one, all Limited Edition Mustangs came with them. Note: Ford only put emblems on the hood scoop of cars
with 351 engines or larger displacement. Since this car was originally equiped with a 302 it did not have scoop emblems.
Here is a picture of the scoop after installation. Though any 1969 Mustang could be ordered with one, all Limited Edition Mustangs came with them. Note: Ford only put emblems on the hood scoop of cars
with 351 engines or larger displacement. Since this car was originally equiped with a 302 it did not have scoop emblems.
 Here is a rear view of the hood scoop showing the directional indicators. Note: The upper valance panel is not bolted in place in this picture so the gaps aren't correct yet.