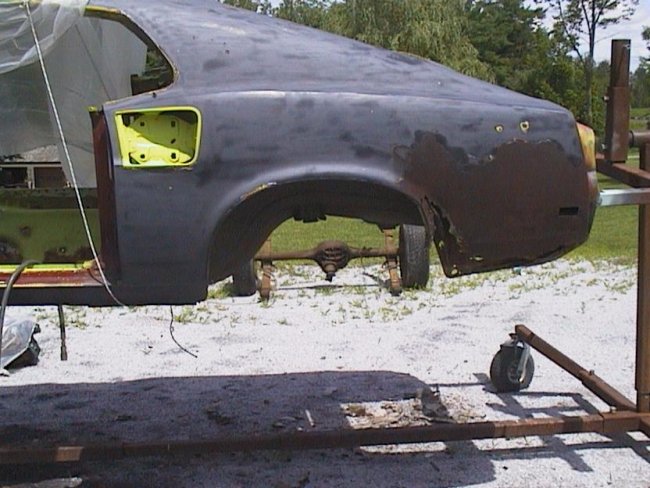
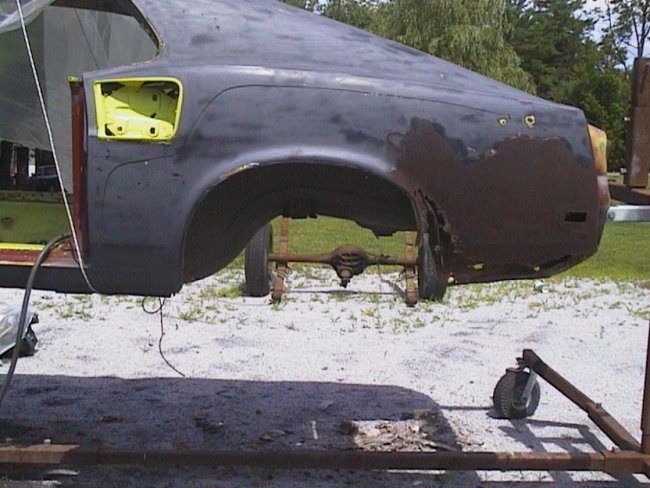
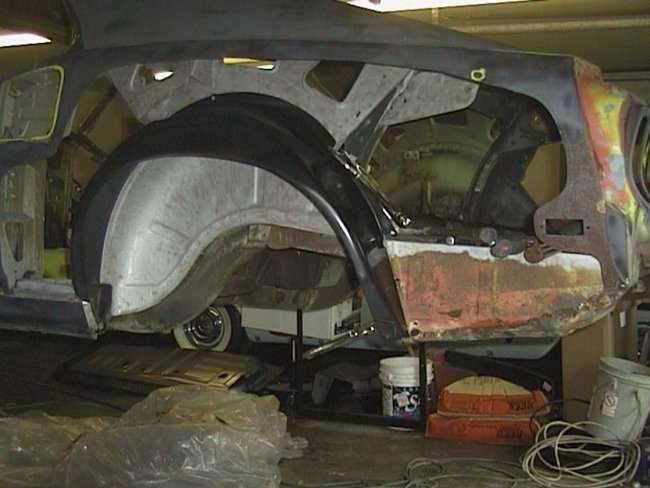
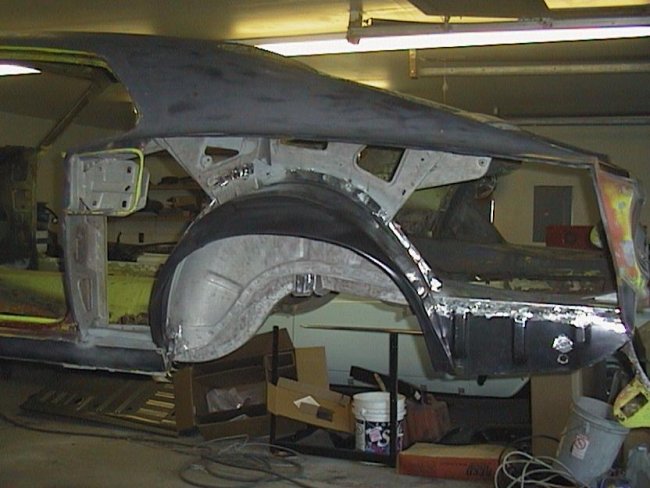
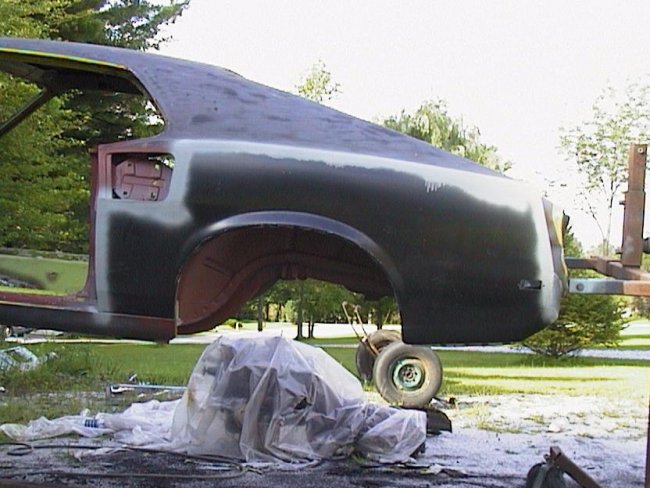
 We start with the left rear quarter in its original state. As can be seen from this picture, there is an enormous amount of the panel that has been
rusted away in the rear. There is also lots of rust damage to the trunk drop-off area. The large amount of rust across the surface of the rear of the
panel was actually caused by someone who ground off the remnants of a previous repair and never protected the surface.
We start with the left rear quarter in its original state. As can be seen from this picture, there is an enormous amount of the panel that has been
rusted away in the rear. There is also lots of rust damage to the trunk drop-off area. The large amount of rust across the surface of the rear of the
panel was actually caused by someone who ground off the remnants of a previous repair and never protected the surface. - Road Debris: Road debris plugs the drains in the lower trunk drop offs. This causes moisture to be trapped inside the drop-off area. , which causes it to rust out from the inside. This can be prevented by cleaning these areas out regularly, which no one really does.
- Paint Damage: Stones and other road debris are also kicked up by the tires which can chip through the paint on the outside of the fender. Any exposed metal will form rust.
- Failed Weather Seals: The materials that make up the weather seals do not last for ever. Eventually they break down. This allows water to flow inside the quarter panel by the rear quarter windows, the rear window and the trunklid.
- Design and Construction: Frankly, these cars were never designed to last very long. They were welded together with bare steel and the areas that were not visible to the eye were left untreated or received minimum overspray during the priming and paint process. During the restoration these areas should be treated to ensure that they will not rust again.
The marker light opening does not need to be saved, but it needs to remain intact during the initial cutting phase so that its position can be transfered to the new panel. You can see this process at the bottom of the page or by clicking here.
The wheel well opening can not be saved since we need to replace the entire outer wheel well. Unless the edge along the wheel well opening is in a prestine rust free and dent free condition its never a good idea to keep it intact, because it will eventually get worse. The repo quarter skins are pretty good in this area, but they lack the line-up holes that are on the factory originals.
The short section on top of the rocker panel should probably always be replaced since its a lot harder to save and the seem is most likely rusted inside. It would also most likely be damaged while removing and replacing the outer wheel well. The repo quarter skins aren't the greatest in this area, but they can be easily adjusted so that they look right when installed.
We know that the scoop opening has to be saved since the skins do not come with this area cut out. Even if they did, I doubt that it would be reproduced accurately enough. This area is the most difficult place to get right. As you will see later, I like to trim the panels real close to the opening so that any mistakes will not be visible once the scoops are installed.
 Here is the quarter during the initial cutting process. The panel is cut along the perimeter a couple inches away from where the final cut will be. It may be desirable to mark the panel before
cutting using a pencil or a marker.
Here is the quarter during the initial cutting process. The panel is cut along the perimeter a couple inches away from where the final cut will be. It may be desirable to mark the panel before
cutting using a pencil or a marker.
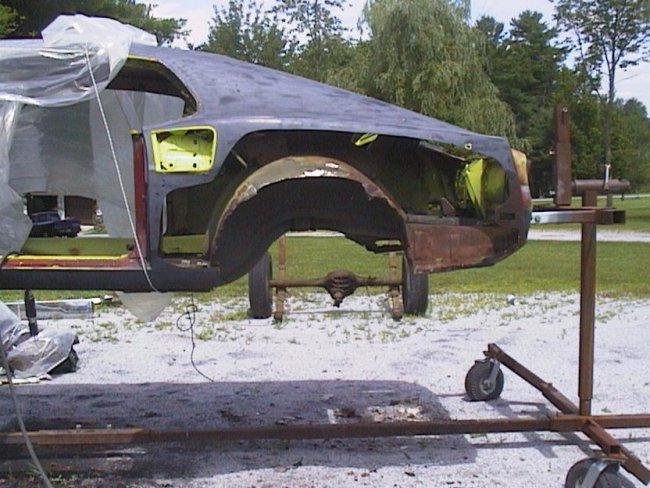 The lip of the outer wheel well is pinch welded to the quarter. Since the outer wheel well is going to be replaced, its best to trim the edge of the wheel well in one piece. To do this just cut
through the lip of the wheel opening at the rear and cut along inside the wheel well to you reach the other side where the quarter was previously cut. In this picture you can see this process
completed.
The lip of the outer wheel well is pinch welded to the quarter. Since the outer wheel well is going to be replaced, its best to trim the edge of the wheel well in one piece. To do this just cut
through the lip of the wheel opening at the rear and cut along inside the wheel well to you reach the other side where the quarter was previously cut. In this picture you can see this process
completed.
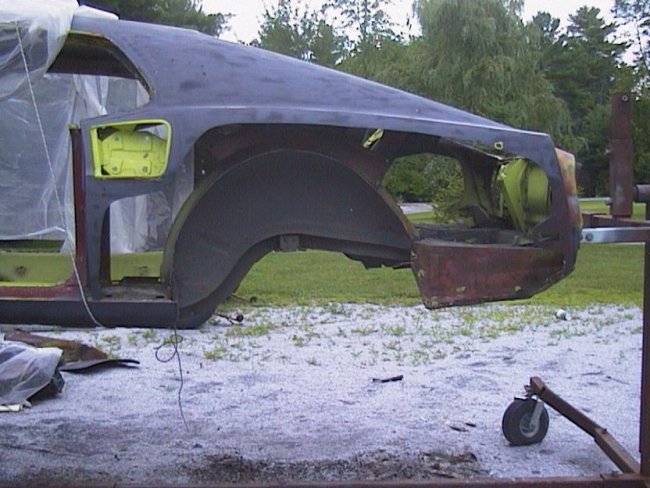 The next thing to do is to completely remove the outer wheel well. The best way to do this is to cut out the bulk of it first. Then drill and grind off the remaining
remnants as discussed here.
The next thing to do is to completely remove the outer wheel well. The best way to do this is to cut out the bulk of it first. Then drill and grind off the remaining
remnants as discussed here.
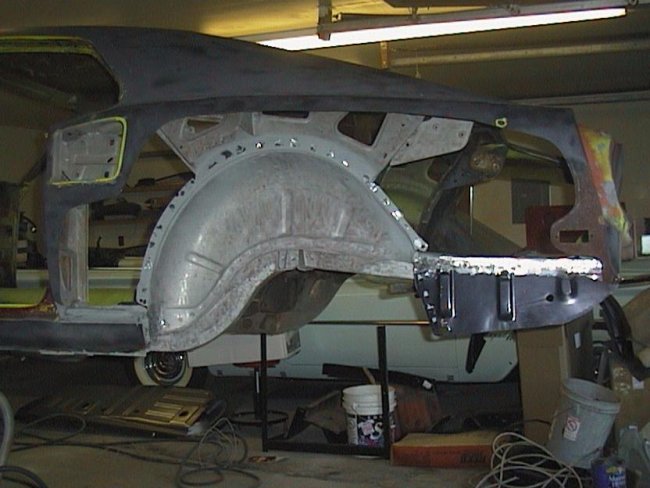
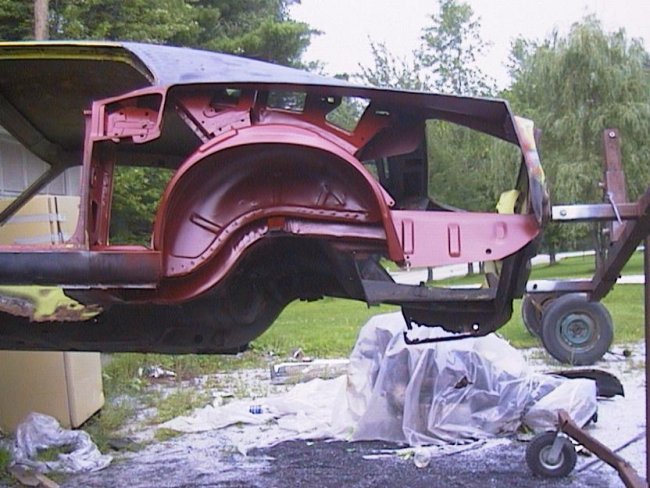
 At this point all visible surfaces along the inside of the quarter should be fully sandblasted. Then the new outer wheelhouse can be fitted and adjusted to the original lower trunk
extension. Here the new outer wheel house is already fitted in place.
At this point all visible surfaces along the inside of the quarter should be fully sandblasted. Then the new outer wheelhouse can be fitted and adjusted to the original lower trunk
extension. Here the new outer wheel house is already fitted in place.
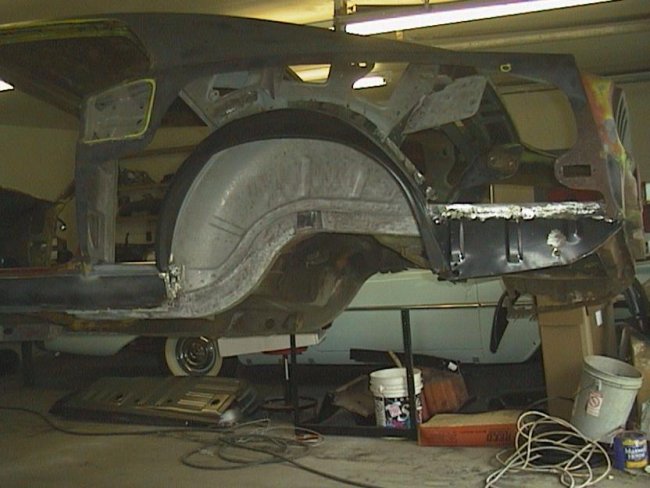
 With the wheelhouse removed, the lower trunk extension is replaced as discussed here.
Here the new lower trunk extension is already welded in place.
It should be noted that the Repo lower trunk extensions have to be modified for 69/70 models. The outer bottom edge needs
to be trimmed and the hole for the reverse light wires needs to be moved.
With the wheelhouse removed, the lower trunk extension is replaced as discussed here.
Here the new lower trunk extension is already welded in place.
It should be noted that the Repo lower trunk extensions have to be modified for 69/70 models. The outer bottom edge needs
to be trimmed and the hole for the reverse light wires needs to be moved.
 The the outer wheel well needs to be fully welded in place before cutting the new quarter panel. Though not shown the new quarter panel was temporarily clamped in place
so that the outer lip of the wheel well was properly adjusted to fit the quarters wheel opening. The outer wheel well was clamped in place and the quarter panel was removed.
The the outer wheel well needs to be fully welded in place before cutting the new quarter panel. Though not shown the new quarter panel was temporarily clamped in place
so that the outer lip of the wheel well was properly adjusted to fit the quarters wheel opening. The outer wheel well was clamped in place and the quarter panel was removed.
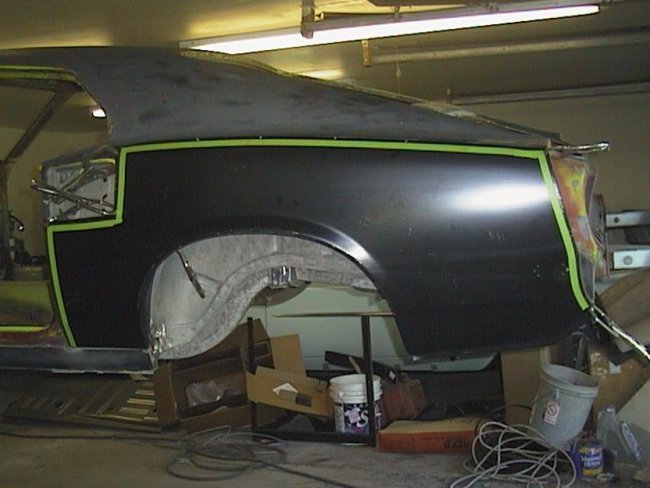 Once the wheel well was welded in, the quarter panel can be clamped in place. Masking tape is used to determine where panel will be cut.
One last detail prior to cutting tjhe quarter panel to fit is to cut out the side marker opening. This process is described at the bottom of the page here.
 The cutting process begins with starter holes for the pneumatic panel cutting saw being drilled in the outer corners marked by the tape (a cut-off wheel could also be used instead).
Then very carefully the saw is used to cut along the taped line. This causes the old panel remnantes to be cut off while simultaneously trimming the new one. By doing it this way,
the skin is a perfect fit for the hole. During this process it may be more desirable to tack weld new panel in as cutting is being performed to eliminate alignment difficulties later.
In this picture the cutting has been completed and the panel and waste has been and removed.
The cutting process begins with starter holes for the pneumatic panel cutting saw being drilled in the outer corners marked by the tape (a cut-off wheel could also be used instead).
Then very carefully the saw is used to cut along the taped line. This causes the old panel remnantes to be cut off while simultaneously trimming the new one. By doing it this way,
the skin is a perfect fit for the hole. During this process it may be more desirable to tack weld new panel in as cutting is being performed to eliminate alignment difficulties later.
In this picture the cutting has been completed and the panel and waste has been and removed.
 The next step is to prepare the inside for priming. The welds can be dress-up with a little fiberglass filler and sand it down smooth.
Then a couple liberal coats of Epoxy primer can be applied (I do not recommend POR15 for this). At this time its also a good idea to prime the inside of the new quarter panel since most of
it cannot be reached after the panel is installed.
The next step is to prepare the inside for priming. The welds can be dress-up with a little fiberglass filler and sand it down smooth.
Then a couple liberal coats of Epoxy primer can be applied (I do not recommend POR15 for this). At this time its also a good idea to prime the inside of the new quarter panel since most of
it cannot be reached after the panel is installed.
 Once the primer has dried seam sealer (3M 08505 Fast&Firm) can applied to joint between outer wheel well and lower trunk drop off since it can not be reached after quarter
is welded in place. Its also I good idea to seam seal the location were the outer wheel well and the rocker panel meet inside the rocker panel since it is very difficult
to reach after the quarter panel is installed. Though not neccesary at this time, I prefer to fill the seam between inner and outer at this time.
Once the primer has dried seam sealer (3M 08505 Fast&Firm) can applied to joint between outer wheel well and lower trunk drop off since it can not be reached after quarter
is welded in place. Its also I good idea to seam seal the location were the outer wheel well and the rocker panel meet inside the rocker panel since it is very difficult
to reach after the quarter panel is installed. Though not neccesary at this time, I prefer to fill the seam between inner and outer at this time.
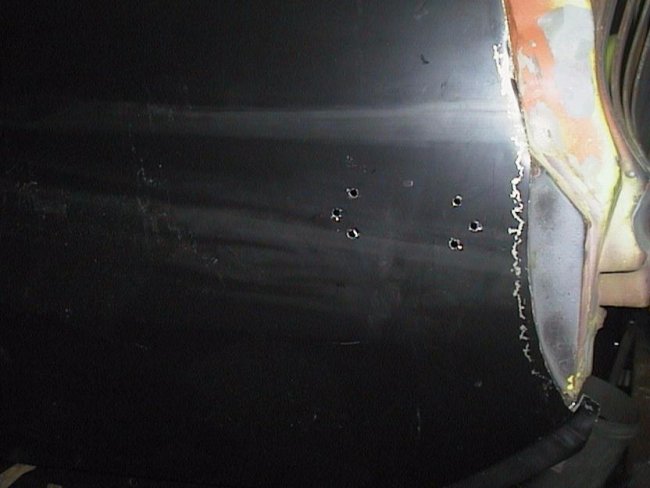
 At this point if a pinch welder is not available a series of 1/4" or 3/8" holes needs to be drilled along the wheel well opening on the quarter panel prior to clamping the panel in place. Also the lip of the
outer wheel well where the holes will line up to need to be ground down to bare metal. If this is not done it will be next to impossible to weld the quarter panel and wheel well together.
At this point if a pinch welder is not available a series of 1/4" or 3/8" holes needs to be drilled along the wheel well opening on the quarter panel prior to clamping the panel in place. Also the lip of the
outer wheel well where the holes will line up to need to be ground down to bare metal. If this is not done it will be next to impossible to weld the quarter panel and wheel well together.
In this picture the quarter panel has already been tacked welded in place around the perimeter. Butt-welding clamps are used to hold the panels together for this. The only problem is that all of the clamps that I've seen are 0.040" thick and need to be ground down to the same thickness of the saw blades that were used to cut the panels out. In this case the clamps had to be ground down to 0.025".
Here are a few pictures that were taken from inside the car during the welding process. (Click on an image to make it larger.) You can see in these pictures that the panel is tacked every inch or so. The panels are carefully aligned so that the surface of the new panel is flush with the existing metal. The weld not only holds the panels together, but it also fills the gap.
 The weld is then ground down flush, inside and out. If any light is visible through the panel, the weld will need to be touched-up.
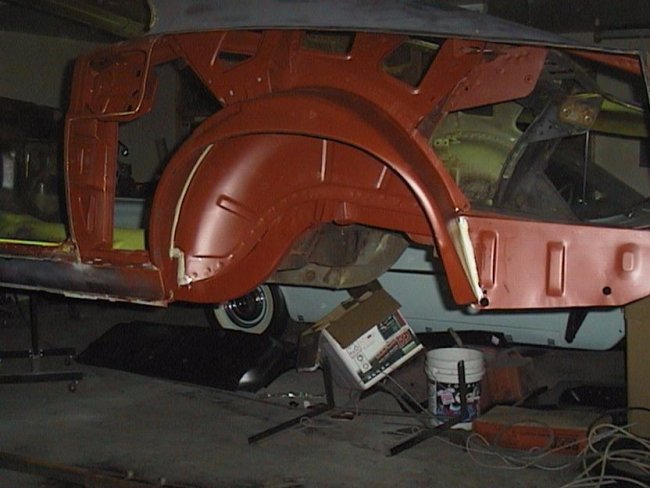
In this picture the welding has been completed and the weld has been covered with primer to protect it from rust while the other side of the
car is waiting to be worked on. The primer will be completely removed prior to any filler work.
The weld is then ground down flush, inside and out. If any light is visible through the panel, the weld will need to be touched-up.
In this picture the welding has been completed and the weld has been covered with primer to protect it from rust while the other side of the
car is waiting to be worked on. The primer will be completely removed prior to any filler work.
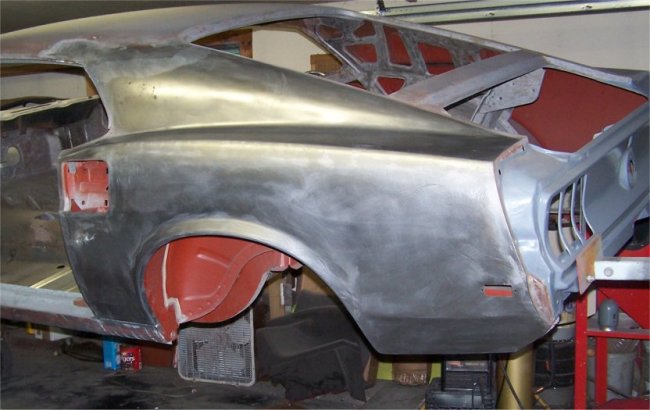
 UPDATED (beginning 9/13/05): I decided that I would try to learn how to do leadwork on this car since I will be need the experience on my 63 Jaguar. I bought a basic lead kit
for Eastwood. I watched the video that came with it. I also read a few articles on leadloading. My first attempt at leadloading was on the rear section of the LH quarter.
After filing I like the results so I did the whole quarter. Since I was jsut starting out I decide that I would just lead over the butt-weld seams. In this picture you
can see the rear section of the quarter has been filed down. It is very important at this stage to trial fit the side scoop. There should be abolutely no gap arpund the lip
of the scoop when its installed. Not only would a gap look bad, making it obvious that work has been done, but a gap will allow water and debris to get inside the quarter.
UPDATED (beginning 9/13/05): I decided that I would try to learn how to do leadwork on this car since I will be need the experience on my 63 Jaguar. I bought a basic lead kit
for Eastwood. I watched the video that came with it. I also read a few articles on leadloading. My first attempt at leadloading was on the rear section of the LH quarter.
After filing I like the results so I did the whole quarter. Since I was jsut starting out I decide that I would just lead over the butt-weld seams. In this picture you
can see the rear section of the quarter has been filed down. It is very important at this stage to trial fit the side scoop. There should be abolutely no gap arpund the lip
of the scoop when its installed. Not only would a gap look bad, making it obvious that work has been done, but a gap will allow water and debris to get inside the quarter.
 Here the all of the lead has been filed down and I used an orbital sander with 80 grit disks to smooth out the scratches in the lead.
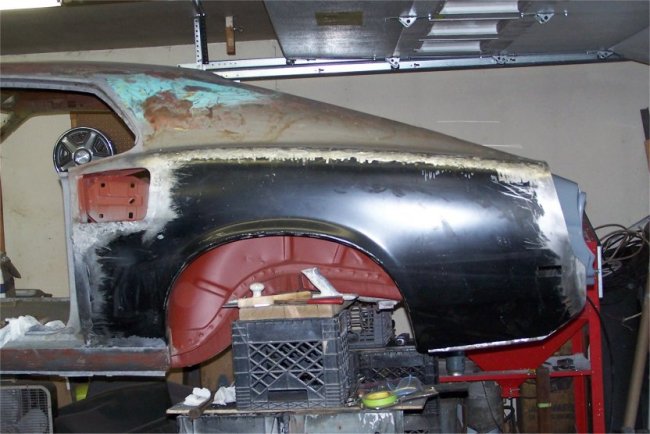
 Of course there were imperfections in my lead work. It takes a real pro to do lead work without requiring plastic filler to finish the job. Unfortunately I'm not that
good yet. I used Evercoat Plastic filler to fill in the imperfections in the panel. You may also notice the filler near the roof. This is where the
factory roof seam is. The factory filled the seam with lead. Sometimes the factory did a pretty sloppy job, resulting in a noticable seam under the paint. In this case
they did a real bad job. I had to file down a bunch of the factory lead. I then had to fill the low spots. I did not want the seam to show.
Of course there were imperfections in my lead work. It takes a real pro to do lead work without requiring plastic filler to finish the job. Unfortunately I'm not that
good yet. I used Evercoat Plastic filler to fill in the imperfections in the panel. You may also notice the filler near the roof. This is where the
factory roof seam is. The factory filled the seam with lead. Sometimes the factory did a pretty sloppy job, resulting in a noticable seam under the paint. In this case
they did a real bad job. I had to file down a bunch of the factory lead. I then had to fill the low spots. I did not want the seam to show.
In this picture all of the work is done. The quarter is wiped down and is masked for the primer coat.
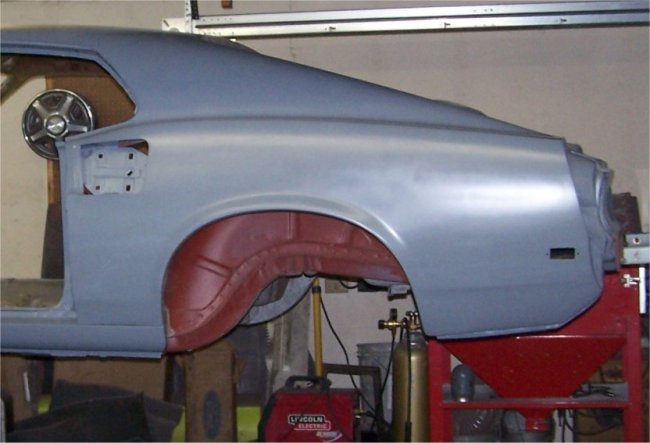 Here is the quarter after it has received 3 coats of epoxy primer. It will remain in this state until the entire shell is in primer. Then the whole thing gets block-sanded and
recoated with a high-build primer. Then the high-build primer coat gets block sanded and reprimed hopefully for the last time.
Here is the quarter after it has received 3 coats of epoxy primer. It will remain in this state until the entire shell is in primer. Then the whole thing gets block-sanded and
recoated with a high-build primer. Then the high-build primer coat gets block sanded and reprimed hopefully for the last time.
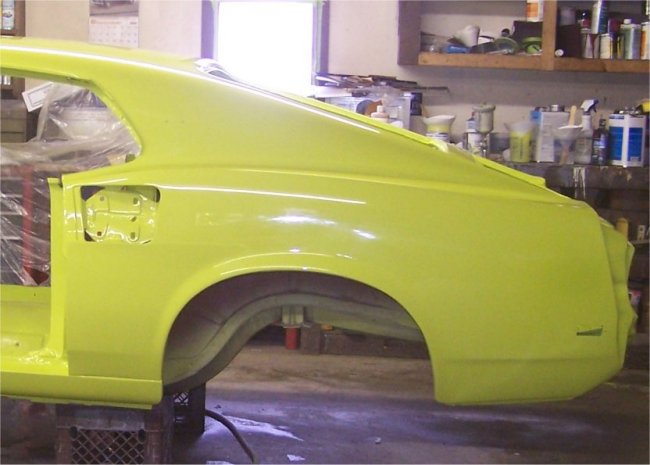 Here is the quarter after it has been painted, block sanded with 2000 grit paper and buffed twice. OOh Yah !
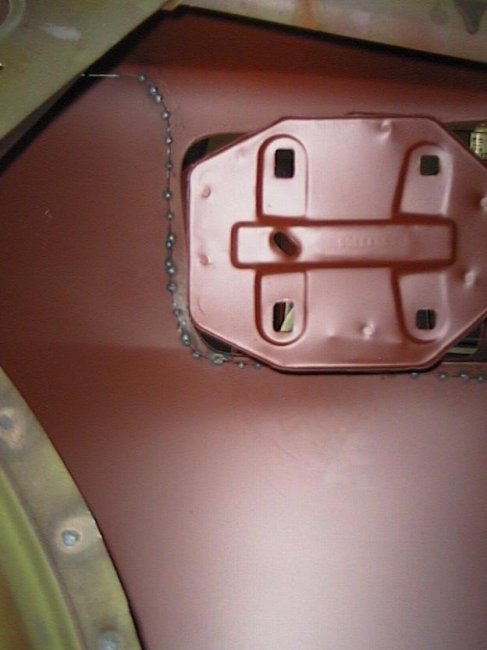
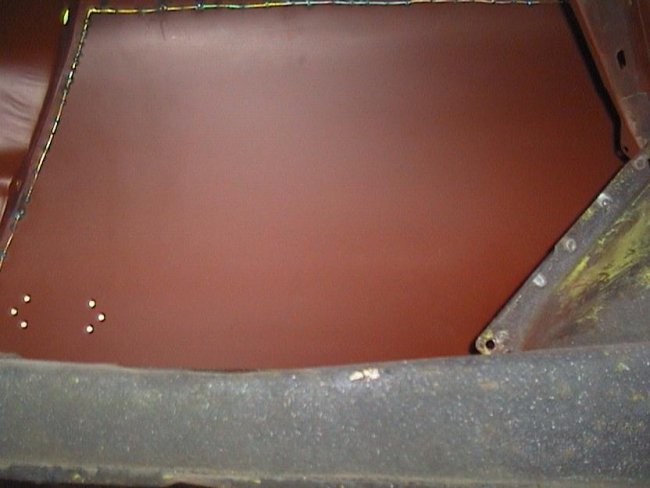
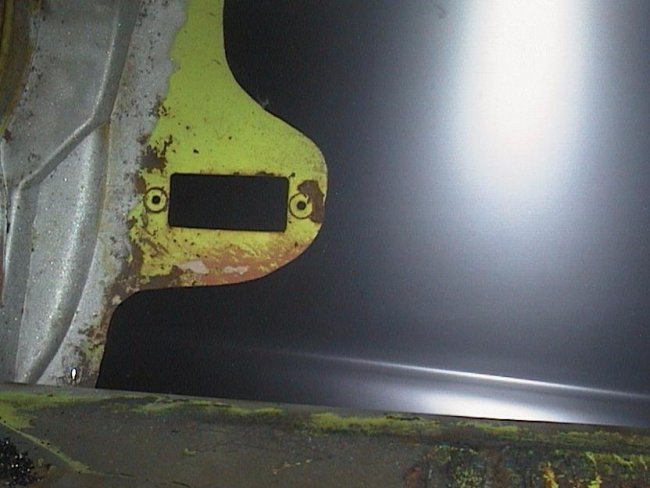 The best time to cut the side marker light holes is with the new quarter panel skin tacked in place, just
before the quarter panel is cut to fit the car. In this picture you can see its original location viewed
from inside the trunk.
The best time to cut the side marker light holes is with the new quarter panel skin tacked in place, just
before the quarter panel is cut to fit the car. In this picture you can see its original location viewed
from inside the trunk.
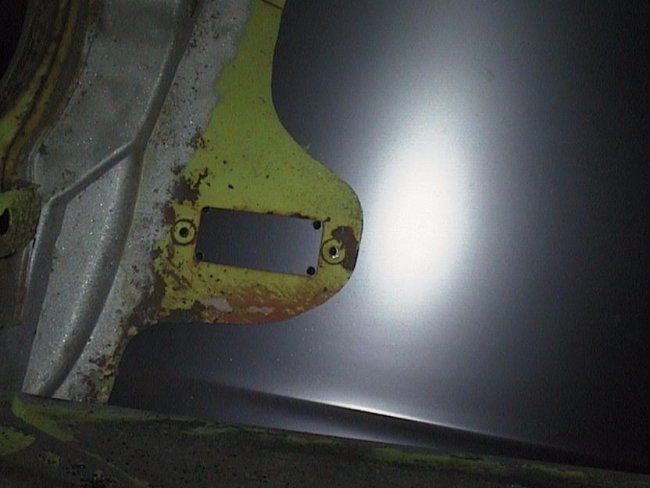 Basically making the holes for the side markers lights is kind of like cutting a hole in a counter top for a sink. You drill four
holes in the outer four corners and you cut out the piece in the middle.
Basically making the holes for the side markers lights is kind of like cutting a hole in a counter top for a sink. You drill four
holes in the outer four corners and you cut out the piece in the middle.
 Here's a picture on the outside of the panel. The final cutting is performed after the quarter panel has need welded in. This is so that the panel
is held as rigid as possible. Once the hole is cut out a flat file is used to smooth out the straight edges and
a small round file is used to clean up the corners.
Here's a picture on the outside of the panel. The final cutting is performed after the quarter panel has need welded in. This is so that the panel
is held as rigid as possible. Once the hole is cut out a flat file is used to smooth out the straight edges and
a small round file is used to clean up the corners.
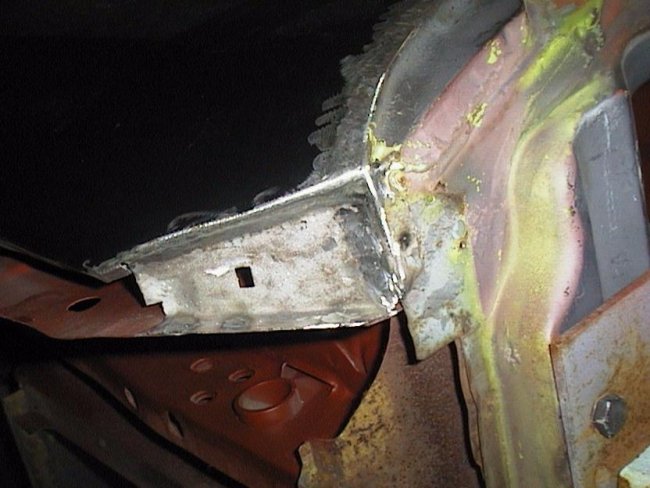
 On the underside of the rear quarter panels is an indentation that is not reproduced on the reproduction quarter panels. It is made
up of an indentation about a foot long that steps down towards the front by the drain plug. This is usually the first part to rust
away. Since the omission of this indentation is a dead giveaway that the quarters have been changed, I always go threw the trouble
of reproducing it. I always start with the new quarter skin installed.
On the underside of the rear quarter panels is an indentation that is not reproduced on the reproduction quarter panels. It is made
up of an indentation about a foot long that steps down towards the front by the drain plug. This is usually the first part to rust
away. Since the omission of this indentation is a dead giveaway that the quarters have been changed, I always go threw the trouble
of reproducing it. I always start with the new quarter skin installed.
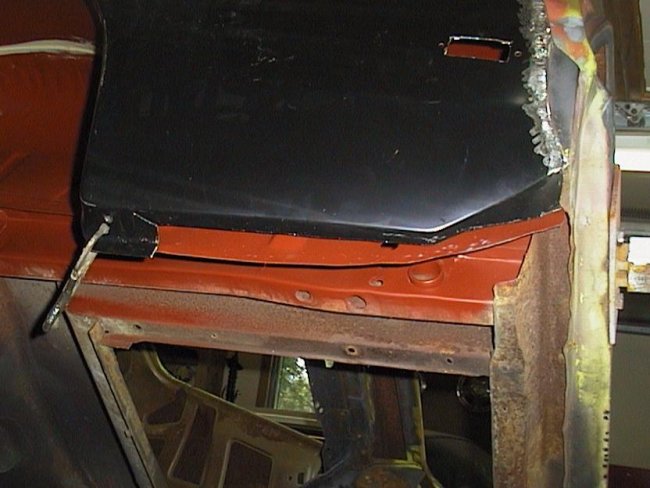
 Luckily I've always been able to save the rear section where the valance panel attaches. I install this piece first. This is done
by bending the new quarter skin along the seam and trimming it about a half inch past the bend. I then clamp the old piece in place
and cut the two pieces clamped together, just like the way the quarter panel is cut. Then its just a matter of butt-welding the
pieces together. Here you see the process partially completed.
Luckily I've always been able to save the rear section where the valance panel attaches. I install this piece first. This is done
by bending the new quarter skin along the seam and trimming it about a half inch past the bend. I then clamp the old piece in place
and cut the two pieces clamped together, just like the way the quarter panel is cut. Then its just a matter of butt-welding the
pieces together. Here you see the process partially completed.
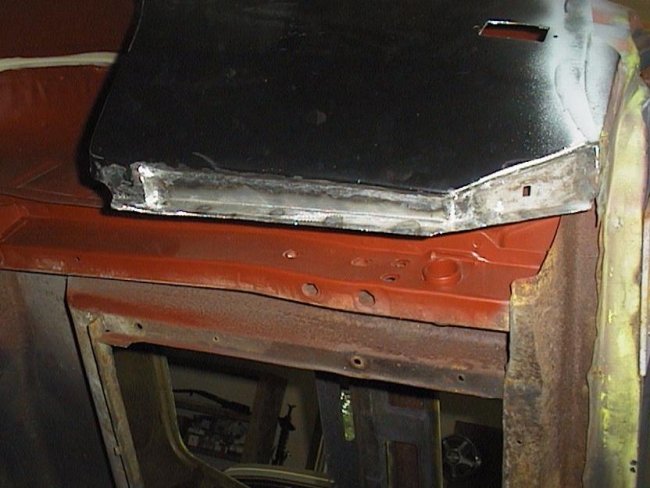 I create a new lower piece by making a cardboard template of the old one, trial fitting and trimming the template and then copying
the template onto a piece of new sheetmetal. The new piece is clamped in place and butt-welded in. Here is a picture of the finished
product. Note: I get into a little more detail on this repair on the next page.
I create a new lower piece by making a cardboard template of the old one, trial fitting and trimming the template and then copying
the template onto a piece of new sheetmetal. The new piece is clamped in place and butt-welded in. Here is a picture of the finished
product. Note: I get into a little more detail on this repair on the next page.