|
Fender Apron Shocktower Overlap |
|
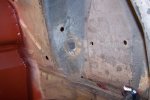
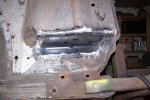
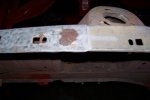 Mustangs are famous for rusting out where the fender aprons are welded to the top of the shock towers (Four locations in all).
What makes things more difficult is sometimes the confidential VIN was stamped on the top of the shock towers. Not only was
this car rusted in all 4 locations, but the '*9' portion of the VIN was near the rust hole on the left side and the '*' portion of
the VIN was near the hole on the right side. Here I will show you how I repair these areas. In this picture you can see what I started with.
Mustangs are famous for rusting out where the fender aprons are welded to the top of the shock towers (Four locations in all).
What makes things more difficult is sometimes the confidential VIN was stamped on the top of the shock towers. Not only was
this car rusted in all 4 locations, but the '*9' portion of the VIN was near the rust hole on the left side and the '*' portion of
the VIN was near the hole on the right side. Here I will show you how I repair these areas. In this picture you can see what I started with.
|
|
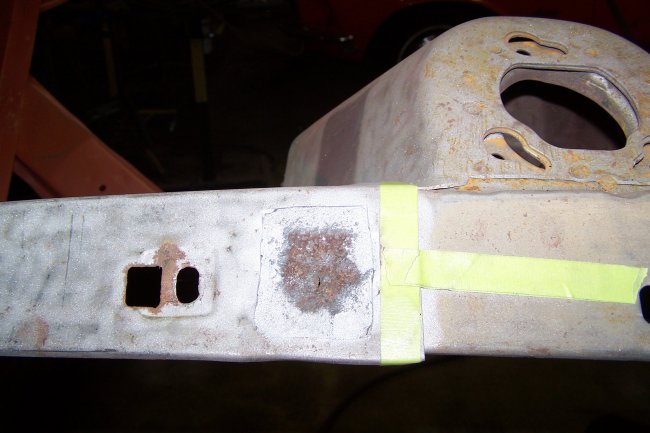
 The first thing I did was to cut the rusted section of the fender apron off. I covered the VIN with masking tape to mark off the 'do not cut' zone. Here
you can see the first layer cut away. I the idea is to only cut into the fender apron.
The first thing I did was to cut the rusted section of the fender apron off. I covered the VIN with masking tape to mark off the 'do not cut' zone. Here
you can see the first layer cut away. I the idea is to only cut into the fender apron.
|
|
 The next thing I did was to sandblast the hole clean. The idea here was to remove all of the rust and to find where the metal that was not rust pitted.
|
|
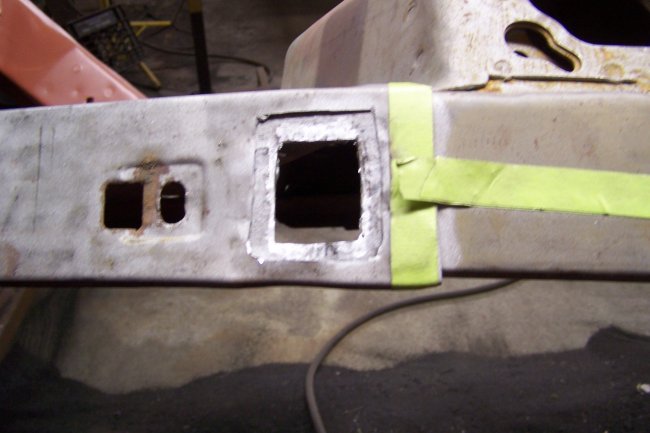
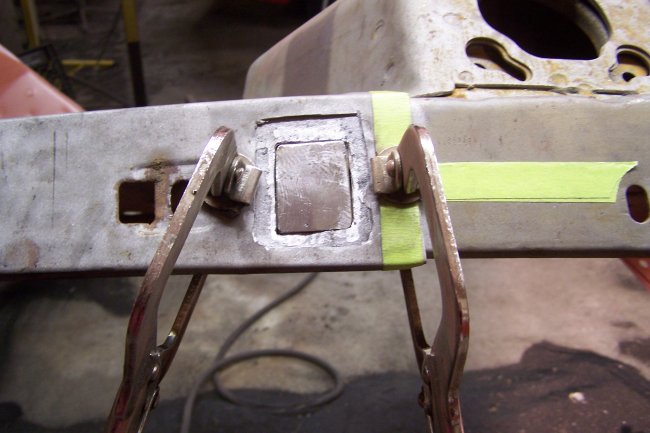
 The next thing I did was to cut out the top section of the shocktower that was pitted. The idea, hopefully, is to cut out a smaller square then the one that was
cut in the fender apron. This will make the welding easier
The next thing I did was to cut out the top section of the shocktower that was pitted. The idea, hopefully, is to cut out a smaller square then the one that was
cut in the fender apron. This will make the welding easier
|
|
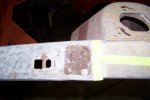
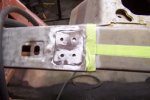
 I match using metal of the same gauge as the shocktower metal. A backer plate was clamped in place and the patch was dropped in the hole.
|
|
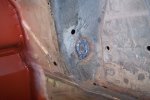
 The patch was first tacked in place and then it was fully welded. There was no reason to spot or stitch weld it in since the metal was way too thick to warp. The weld
was then ground down using a cut-off wheel with a 1/8 inch thick disk.
The patch was first tacked in place and then it was fully welded. There was no reason to spot or stitch weld it in since the metal was way too thick to warp. The weld
was then ground down using a cut-off wheel with a 1/8 inch thick disk.
|
|
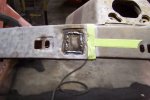
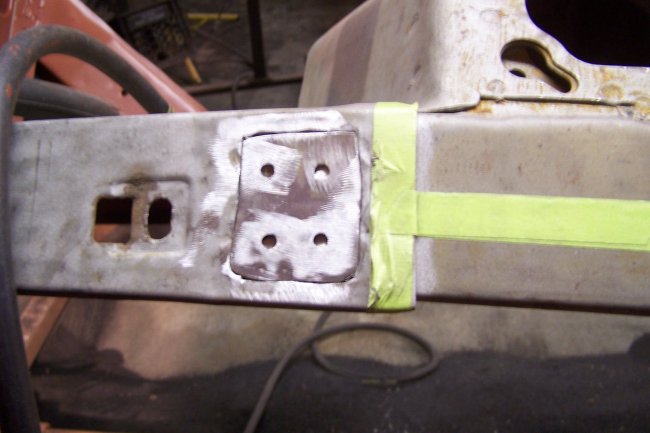
 Next came the top patch. The patch was first butt-welded to the fender apron. Then it was clamped tight to the shocktower where it was plug-welded in place.
|
|
 Here it is with the welds all ground down.
|
|
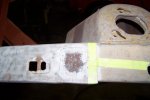
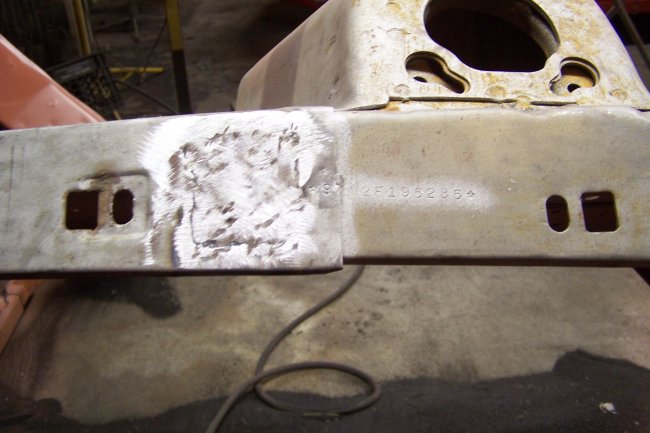
 A little filler was used for detailing. It should be noted that I did not reproduce the factory spot welds since most of them including the VIN was to be covered with the
fender once it was installed. Too bad, the VIN came out looking pretty clear. There are a couple methods one can use to reproduce the spot weld look. You could heat a spot till
its cherry red and hit it with a hammer and a fat punch. Or you can take a dremmel tool and grind out a recess at the plug welds.
A little filler was used for detailing. It should be noted that I did not reproduce the factory spot welds since most of them including the VIN was to be covered with the
fender once it was installed. Too bad, the VIN came out looking pretty clear. There are a couple methods one can use to reproduce the spot weld look. You could heat a spot till
its cherry red and hit it with a hammer and a fat punch. Or you can take a dremmel tool and grind out a recess at the plug welds.
|
|
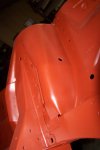
 Here it is after priming. The '*9' portion of the VIN can be seen on the fender apron.
|
|
Shocktower Upper Control Arm Holes |
|
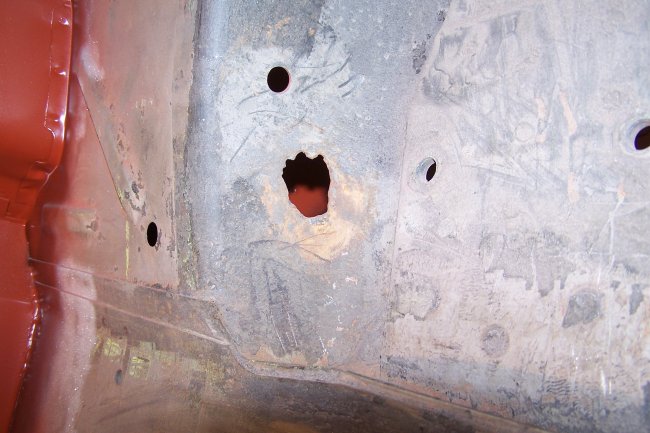
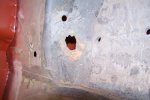 Another 'Better Idea' that Ford had on these cars was that instead of putting grease fittings on the ends of the upper control arms, they put plugs. So eventually when the grease was squeezed out
or dried up the front suspension would squeek or even worse the pivot shafts would start to wear. As a result it was very common for some mechanics, hacks, to take a torch and cut holes in the sides
of the shocktowers to access the plugs and put in grease fittings. My car also experienced some of these world class modifications as seen in this picture. This was the prettiest one.
Another 'Better Idea' that Ford had on these cars was that instead of putting grease fittings on the ends of the upper control arms, they put plugs. So eventually when the grease was squeezed out
or dried up the front suspension would squeek or even worse the pivot shafts would start to wear. As a result it was very common for some mechanics, hacks, to take a torch and cut holes in the sides
of the shocktowers to access the plugs and put in grease fittings. My car also experienced some of these world class modifications as seen in this picture. This was the prettiest one.
|
|
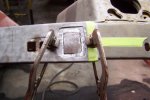
 The repair process is quite straight forward. Grind both sides of the hole flat, clean the inside of the hole and weld in a patch. In this picture the patch is held in place just prior to welding it in.
|
|
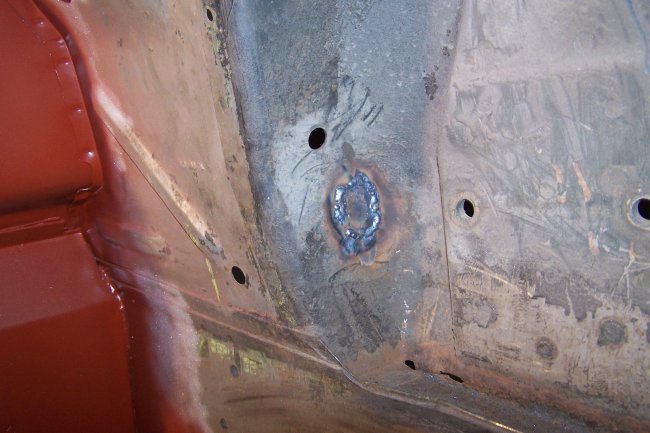
 And here it is welded in. At this point its a simple matter of grinding down the weld, applying a little filler for detailing and hit it with primer.
|
|
 Here is after priming. You can't tell that there as a gaping hole. It should be noted that right angle grease fittings will be added to the upper control arms so that they can be
properly greased in the future. Though they are not concourse correct, you should add the fittings if you plan on driving the car alot.
Here is after priming. You can't tell that there as a gaping hole. It should be noted that right angle grease fittings will be added to the upper control arms so that they can be
properly greased in the future. Though they are not concourse correct, you should add the fittings if you plan on driving the car alot.
|
|
Battery Tray |
|
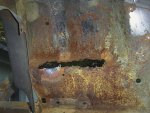 Another bad area on Mustangs is the battery tray area. Since they were not using sealed batteries back then, there is always a chance for battery acid to damage the battery tray and the fender apron. On this
car there was a gaping hole in this area.
Another bad area on Mustangs is the battery tray area. Since they were not using sealed batteries back then, there is always a chance for battery acid to damage the battery tray and the fender apron. On this
car there was a gaping hole in this area.
|
|
 Its vey common for restorers to just replace the apron. However, repos are not correct for 1969 and in this case part of the VIN was stamped on the apron. My only choice was to repair what was there.
I started by buying the cheap repo part which cost $24. I cut the pan area out of it an clamped it in place over the rusted area. I then cut through both layers simultaneously resulting in a patch that
was a perfect fit. Here is the patch alreaded butt-welded in place.
Its vey common for restorers to just replace the apron. However, repos are not correct for 1969 and in this case part of the VIN was stamped on the apron. My only choice was to repair what was there.
I started by buying the cheap repo part which cost $24. I cut the pan area out of it an clamped it in place over the rusted area. I then cut through both layers simultaneously resulting in a patch that
was a perfect fit. Here is the patch alreaded butt-welded in place.
|
|
 For this area I used lead on both sides of the fender apron for most of the filler work. You may notice that the battery reenforcement plate is missing from the underside of the fender apron. I wanted to
primed and paint the engine compartment before installing it so that I had extra protection in the future. The original reenforcement was detroyed by battery acid. Luckily there are a couple versions of the
reenforcement being reproduced. Mansfield Mustang sells an exact reproduction of the part. NPD also sells one as well.
For this area I used lead on both sides of the fender apron for most of the filler work. You may notice that the battery reenforcement plate is missing from the underside of the fender apron. I wanted to
primed and paint the engine compartment before installing it so that I had extra protection in the future. The original reenforcement was detroyed by battery acid. Luckily there are a couple versions of the
reenforcement being reproduced. Mansfield Mustang sells an exact reproduction of the part. NPD also sells one as well.
|
|
Detailing and Primer |
|
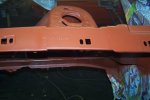
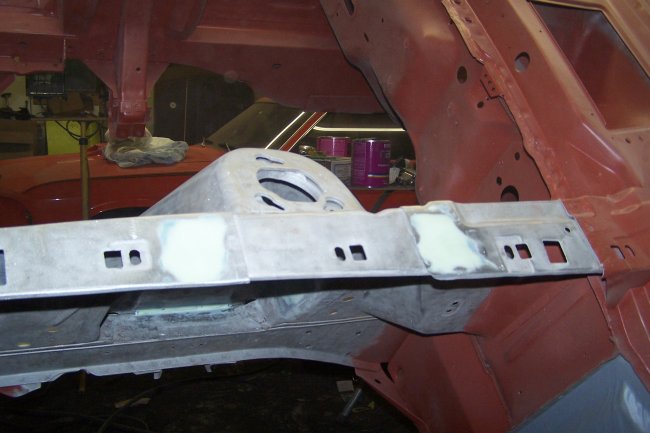
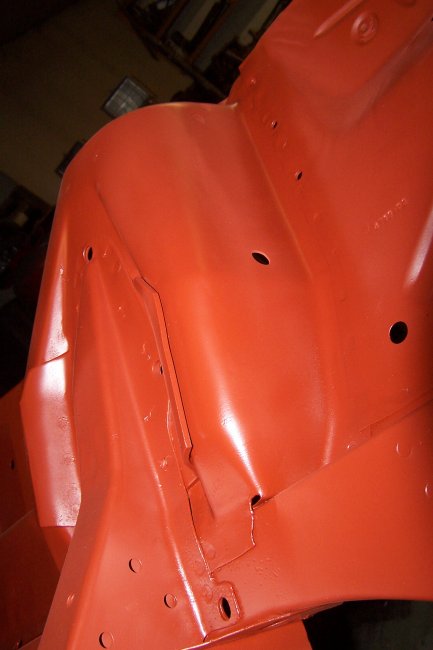
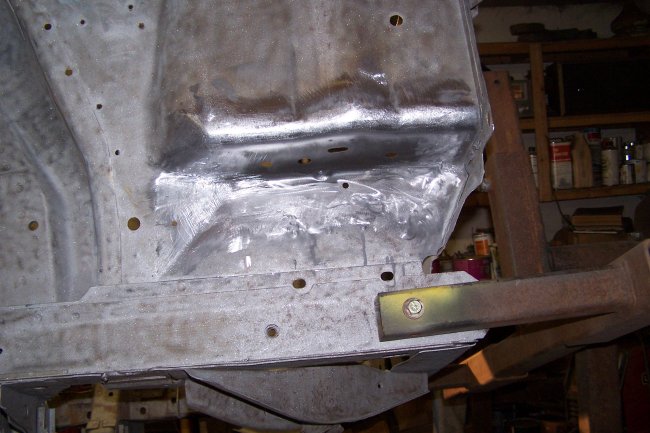
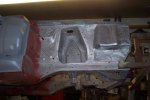 Once all of the welding is done, that is when I use filler to fix the minor imperfections in the repairs. In this picture you can see the repairs I made to the sides of the shocktower, the underside of the shocktower,
the battery tray and the starter solenoid mounting location.
Once all of the welding is done, that is when I use filler to fix the minor imperfections in the repairs. In this picture you can see the repairs I made to the sides of the shocktower, the underside of the shocktower,
the battery tray and the starter solenoid mounting location.
|
|
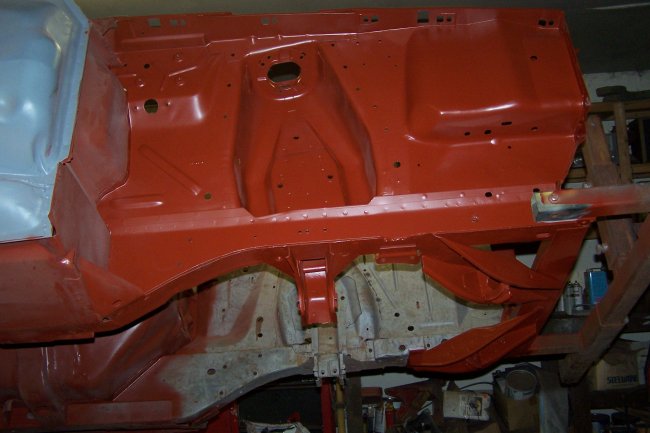
 Here its after being primed. The primer was eventually sanded with 220 and reprimed just prior to painting the entire engine compartment.
|
 Mustangs are famous for rusting out where the fender aprons are welded to the top of the shock towers (Four locations in all).
What makes things more difficult is sometimes the confidential VIN was stamped on the top of the shock towers. Not only was
this car rusted in all 4 locations, but the '*9' portion of the VIN was near the rust hole on the left side and the '*' portion of
the VIN was near the hole on the right side. Here I will show you how I repair these areas. In this picture you can see what I started with.
Mustangs are famous for rusting out where the fender aprons are welded to the top of the shock towers (Four locations in all).
What makes things more difficult is sometimes the confidential VIN was stamped on the top of the shock towers. Not only was
this car rusted in all 4 locations, but the '*9' portion of the VIN was near the rust hole on the left side and the '*' portion of
the VIN was near the hole on the right side. Here I will show you how I repair these areas. In this picture you can see what I started with.
 The first thing I did was to cut the rusted section of the fender apron off. I covered the VIN with masking tape to mark off the 'do not cut' zone. Here
you can see the first layer cut away. I the idea is to only cut into the fender apron.
The first thing I did was to cut the rusted section of the fender apron off. I covered the VIN with masking tape to mark off the 'do not cut' zone. Here
you can see the first layer cut away. I the idea is to only cut into the fender apron.
 The next thing I did was to sandblast the hole clean. The idea here was to remove all of the rust and to find where the metal that was not rust pitted.
 The next thing I did was to cut out the top section of the shocktower that was pitted. The idea, hopefully, is to cut out a smaller square then the one that was
cut in the fender apron. This will make the welding easier
The next thing I did was to cut out the top section of the shocktower that was pitted. The idea, hopefully, is to cut out a smaller square then the one that was
cut in the fender apron. This will make the welding easier
 I match using metal of the same gauge as the shocktower metal. A backer plate was clamped in place and the patch was dropped in the hole.
 The patch was first tacked in place and then it was fully welded. There was no reason to spot or stitch weld it in since the metal was way too thick to warp. The weld
was then ground down using a cut-off wheel with a 1/8 inch thick disk.
The patch was first tacked in place and then it was fully welded. There was no reason to spot or stitch weld it in since the metal was way too thick to warp. The weld
was then ground down using a cut-off wheel with a 1/8 inch thick disk.
 Next came the top patch. The patch was first butt-welded to the fender apron. Then it was clamped tight to the shocktower where it was plug-welded in place.
 Here it is with the welds all ground down.
 A little filler was used for detailing. It should be noted that I did not reproduce the factory spot welds since most of them including the VIN was to be covered with the
fender once it was installed. Too bad, the VIN came out looking pretty clear. There are a couple methods one can use to reproduce the spot weld look. You could heat a spot till
its cherry red and hit it with a hammer and a fat punch. Or you can take a dremmel tool and grind out a recess at the plug welds.
A little filler was used for detailing. It should be noted that I did not reproduce the factory spot welds since most of them including the VIN was to be covered with the
fender once it was installed. Too bad, the VIN came out looking pretty clear. There are a couple methods one can use to reproduce the spot weld look. You could heat a spot till
its cherry red and hit it with a hammer and a fat punch. Or you can take a dremmel tool and grind out a recess at the plug welds.
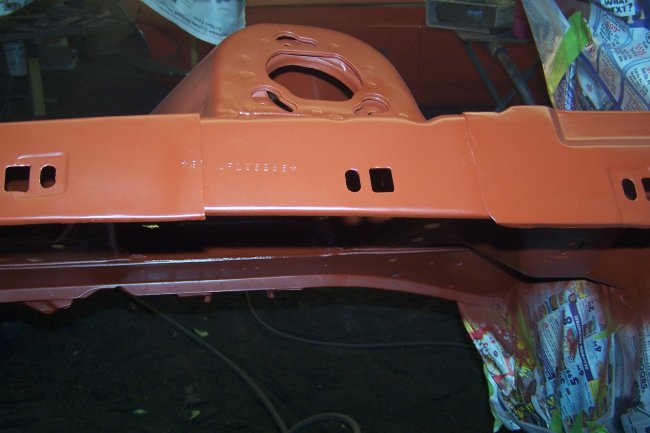 Here it is after priming. The '*9' portion of the VIN can be seen on the fender apron.
 Another 'Better Idea' that Ford had on these cars was that instead of putting grease fittings on the ends of the upper control arms, they put plugs. So eventually when the grease was squeezed out
or dried up the front suspension would squeek or even worse the pivot shafts would start to wear. As a result it was very common for some mechanics, hacks, to take a torch and cut holes in the sides
of the shocktowers to access the plugs and put in grease fittings. My car also experienced some of these world class modifications as seen in this picture. This was the prettiest one.
Another 'Better Idea' that Ford had on these cars was that instead of putting grease fittings on the ends of the upper control arms, they put plugs. So eventually when the grease was squeezed out
or dried up the front suspension would squeek or even worse the pivot shafts would start to wear. As a result it was very common for some mechanics, hacks, to take a torch and cut holes in the sides
of the shocktowers to access the plugs and put in grease fittings. My car also experienced some of these world class modifications as seen in this picture. This was the prettiest one.
 The repair process is quite straight forward. Grind both sides of the hole flat, clean the inside of the hole and weld in a patch. In this picture the patch is held in place just prior to welding it in.
 And here it is welded in. At this point its a simple matter of grinding down the weld, applying a little filler for detailing and hit it with primer.
 Here is after priming. You can't tell that there as a gaping hole. It should be noted that right angle grease fittings will be added to the upper control arms so that they can be
properly greased in the future. Though they are not concourse correct, you should add the fittings if you plan on driving the car alot.
Here is after priming. You can't tell that there as a gaping hole. It should be noted that right angle grease fittings will be added to the upper control arms so that they can be
properly greased in the future. Though they are not concourse correct, you should add the fittings if you plan on driving the car alot.
 Another bad area on Mustangs is the battery tray area. Since they were not using sealed batteries back then, there is always a chance for battery acid to damage the battery tray and the fender apron. On this
car there was a gaping hole in this area.
Another bad area on Mustangs is the battery tray area. Since they were not using sealed batteries back then, there is always a chance for battery acid to damage the battery tray and the fender apron. On this
car there was a gaping hole in this area.
 Its vey common for restorers to just replace the apron. However, repos are not correct for 1969 and in this case part of the VIN was stamped on the apron. My only choice was to repair what was there.
I started by buying the cheap repo part which cost $24. I cut the pan area out of it an clamped it in place over the rusted area. I then cut through both layers simultaneously resulting in a patch that
was a perfect fit. Here is the patch alreaded butt-welded in place.
Its vey common for restorers to just replace the apron. However, repos are not correct for 1969 and in this case part of the VIN was stamped on the apron. My only choice was to repair what was there.
I started by buying the cheap repo part which cost $24. I cut the pan area out of it an clamped it in place over the rusted area. I then cut through both layers simultaneously resulting in a patch that
was a perfect fit. Here is the patch alreaded butt-welded in place.
 For this area I used lead on both sides of the fender apron for most of the filler work. You may notice that the battery reenforcement plate is missing from the underside of the fender apron. I wanted to
primed and paint the engine compartment before installing it so that I had extra protection in the future. The original reenforcement was detroyed by battery acid. Luckily there are a couple versions of the
reenforcement being reproduced. Mansfield Mustang sells an exact reproduction of the part. NPD also sells one as well.
For this area I used lead on both sides of the fender apron for most of the filler work. You may notice that the battery reenforcement plate is missing from the underside of the fender apron. I wanted to
primed and paint the engine compartment before installing it so that I had extra protection in the future. The original reenforcement was detroyed by battery acid. Luckily there are a couple versions of the
reenforcement being reproduced. Mansfield Mustang sells an exact reproduction of the part. NPD also sells one as well.
 Once all of the welding is done, that is when I use filler to fix the minor imperfections in the repairs. In this picture you can see the repairs I made to the sides of the shocktower, the underside of the shocktower,
the battery tray and the starter solenoid mounting location.
Once all of the welding is done, that is when I use filler to fix the minor imperfections in the repairs. In this picture you can see the repairs I made to the sides of the shocktower, the underside of the shocktower,
the battery tray and the starter solenoid mounting location.
 Here its after being primed. The primer was eventually sanded with 220 and reprimed just prior to painting the entire engine compartment.