 With the body stripped the sandblasting was next. This is the messiest part of the
whole job. I blasted the entire interior, the trunk area, the undercarriage, the rear
wheelhouse opening where it is welded to the rear quarter panels, the firewall, the
windshield area and the door openings. It important to get the wheelhouse opening
because thats where the rust usually starts. This area should get special attention
when priming and painting as well.
With the body stripped the sandblasting was next. This is the messiest part of the
whole job. I blasted the entire interior, the trunk area, the undercarriage, the rear
wheelhouse opening where it is welded to the rear quarter panels, the firewall, the
windshield area and the door openings. It important to get the wheelhouse opening
because thats where the rust usually starts. This area should get special attention
when priming and painting as well.
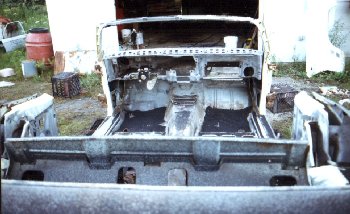
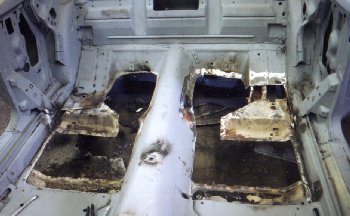
 Here's a shot taken from the front looking towards the rear seat area. The opening
in the middle is the access area for the convertible top pump. When I removed the
backseat there was a cardboard backer glued to this area. The pump and fluid lines
could not be removed without destroying the backer. I couldn't find a reproduction of
this part for a convertible, but the hardtop versions that are available are easily
trimmed to match the original.
Here's a shot taken from the front looking towards the rear seat area. The opening
in the middle is the access area for the convertible top pump. When I removed the
backseat there was a cardboard backer glued to this area. The pump and fluid lines
could not be removed without destroying the backer. I couldn't find a reproduction of
this part for a convertible, but the hardtop versions that are available are easily
trimmed to match the original.A sandblasting of the floor underneath the seat revealed many pinholes. This area of the floor would have to be repaired too. Luckily the floor pan in the front did not have a single hole. All of the damage to this car was caused by water pooled on the floor and under the seat.
 Once sandblasted the quarterpanels and rear decklid area were stripped to the bare metal
with paint stripper. The all of the exposed metal was sanded with an orbital sander. Pits
in the metal caused by sandblasting leaves a rough surface that can't be filled with primer
(unless you spray it on really thick) and plastic filler doesn't stick to it very well either.
Areas that the orbital sander couldn't get into were wire-wheeled with a fine wire-wheel attached
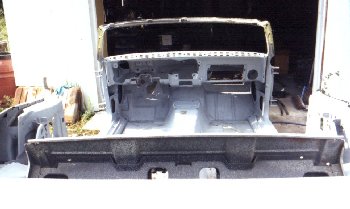
to a drill. Here is the interior after priming.
Once sandblasted the quarterpanels and rear decklid area were stripped to the bare metal
with paint stripper. The all of the exposed metal was sanded with an orbital sander. Pits
in the metal caused by sandblasting leaves a rough surface that can't be filled with primer
(unless you spray it on really thick) and plastic filler doesn't stick to it very well either.
Areas that the orbital sander couldn't get into were wire-wheeled with a fine wire-wheel attached
to a drill. Here is the interior after priming.
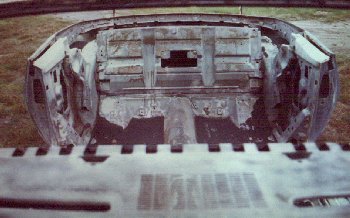
 This view of the body shows the rust hole in the rear quarter and the remainder of the original
paint on the side of the firewall and along the windshield pillar.
This view of the body shows the rust hole in the rear quarter and the remainder of the original
paint on the side of the firewall and along the windshield pillar.
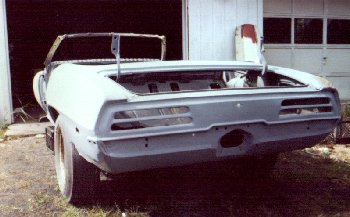 In this rear picture of the primed body you can see the damage to the top of the right
rear quarter panel which occured in some past accident.
In this rear picture of the primed body you can see the damage to the top of the right
rear quarter panel which occured in some past accident.
 With the rust taken care of it was time to turn to the floor. The first thing I did
was to cut out the damaged areas. Of course, this was done with the new pieces measured
and trimmed and with the cuts carefully marked on the floorpan before cutting.
With the rust taken care of it was time to turn to the floor. The first thing I did
was to cut out the damaged areas. Of course, this was done with the new pieces measured
and trimmed and with the cuts carefully marked on the floorpan before cutting.In this picture the floor is cut and the edges were being prepared for the new pieces.
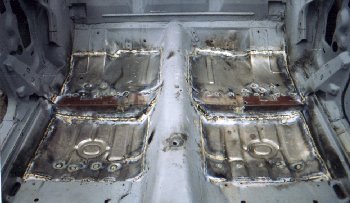 Here is the floor with the welding completed. The new repair panels were welded along the
entire parameter, not only on the top but also from underneath. The pieces in red primer
are reinforcements that were only installed on covertibles. The originals were to far
gone to re-install. Since new onces were not available I had to manufacture my own. They
came out beautifully.
Here is the floor with the welding completed. The new repair panels were welded along the
entire parameter, not only on the top but also from underneath. The pieces in red primer
are reinforcements that were only installed on covertibles. The originals were to far
gone to re-install. Since new onces were not available I had to manufacture my own. They
came out beautifully.With the floor welded all of the welds had to be ground down smooth. The underneath came out so well all I had to do was put a thin coat of seam sealer over the imperfections.
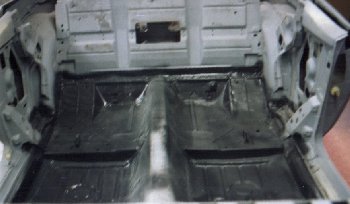 The bare metal was sanded and primed. All of the interior seams were resealed with a good sealer and a
good coat of a quality rubberized undercoating was used to coat the entire floor.
The bare metal was sanded and primed. All of the interior seams were resealed with a good sealer and a
good coat of a quality rubberized undercoating was used to coat the entire floor. The new trunk pan was installed in much the same fassion. Undercoating was not and should not be used on the trunk pan.
 With the floor and trunk done I turned to the left rear quarter panel. Unfortunately I didn't
take any pictures of my work. I replaced the rusted section with a lower quarter repair panel.
The trick is to butt-weld the repair panel at the wheel opening. I'll have pictures of this method
in my 1959 Oldsmobile page.
With the floor and trunk done I turned to the left rear quarter panel. Unfortunately I didn't
take any pictures of my work. I replaced the rusted section with a lower quarter repair panel.
The trick is to butt-weld the repair panel at the wheel opening. I'll have pictures of this method
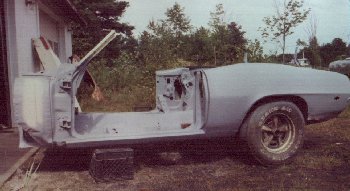
in my 1959 Oldsmobile page. At this point the only body work left to do was to fix the minor dents that were in the right rear quarter panel and on the doors and trunk lid. Here you can see the completed doors re-installed in this rear view of the body just before priming.
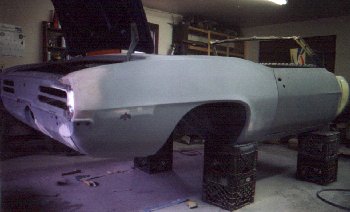
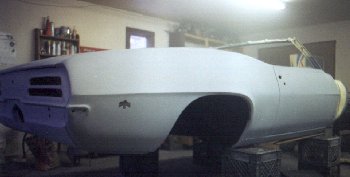 With the quarters repaired the entire body is primed.
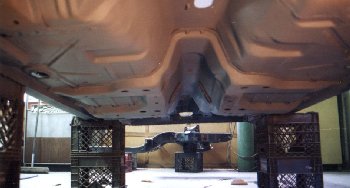 The underside of the car was also primed, but with a self-etching primer.