 The first thing I did was strip the interior out of the car. First I removed
the seats. The rear seats were shot. All of the seat springs were thoroughly rusted
beyond repair. Next came the seatbelts. Although still functional they were way
to pitted and faded to go back on the car.
The first thing I did was strip the interior out of the car. First I removed
the seats. The rear seats were shot. All of the seat springs were thoroughly rusted
beyond repair. Next came the seatbelts. Although still functional they were way
to pitted and faded to go back on the car. The trickiest part was the removal of the console. There are two large philip screws that are screwed through the floor pan into threaded inserts. One was accessible by opening the storage compartement. The other required the removal of the rear cover. Because they go through the floor pan they are susceptible to corrosion. I had to drill the heads off both to prevent damaging the plastic console. Then it was just a matter of applying heat to the remainder of each screw and removing them with a pair of visegrips.
The convertible top system came next. The header bow, of course, needed replacing. Luckily new reproduction ones are available.
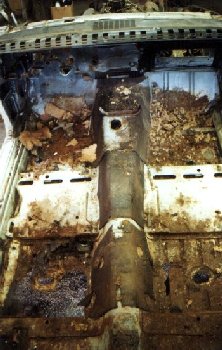
Then came the carpets. With the carpet and sound deadener removed the rust damage to the rear floorpan was worse than I thought (seen here). The area under the rear seat needed repair as well.
With the interior out I moved to the front end. First to come off was the hood and its hinges. Then the wiper arms and the upper valance panel. Next came the nose pieces.
 The first piece to take off when dismantling a 69 Firebird nose is the bumper. Just four carriage bolts
on the top and four on the bottom. Next comes off the 4 inner headlight bezels. Two philip screws each.
Then the outer headlight bezel assemblies come off. These are made out of urethane cover with a rubber insert in the
back that runs the parameter of the fender fronts. These pieces are attached to a steel backer by 5 carriage bolts.
The assemblies are attached to the car by four carraige bolts. Two on the top under the upper filler panel and
two on the bottom. With these off the front insert, also called a boomarang, can be taken off. The rest comes apart
pretty easily. Unlike Camaros there are no assembly manuals to show how these pieces go together. I recommend taking
pictures of things as they are being taken off. Having dismantled and re-assembled the nose I can see why GM had used
carriage bolts and slotted holes to assemble the front. Nothing lines up easily. I had to make full uses of the slots
during re-assembly.
The first piece to take off when dismantling a 69 Firebird nose is the bumper. Just four carriage bolts
on the top and four on the bottom. Next comes off the 4 inner headlight bezels. Two philip screws each.
Then the outer headlight bezel assemblies come off. These are made out of urethane cover with a rubber insert in the
back that runs the parameter of the fender fronts. These pieces are attached to a steel backer by 5 carriage bolts.
The assemblies are attached to the car by four carraige bolts. Two on the top under the upper filler panel and
two on the bottom. With these off the front insert, also called a boomarang, can be taken off. The rest comes apart
pretty easily. Unlike Camaros there are no assembly manuals to show how these pieces go together. I recommend taking
pictures of things as they are being taken off. Having dismantled and re-assembled the nose I can see why GM had used
carriage bolts and slotted holes to assemble the front. Nothing lines up easily. I had to make full uses of the slots
during re-assembly.With the front sheet metal removed it was pretty easy to finish stripping down the firewall.
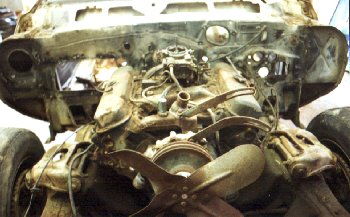
 With the motor still in the car I dismantled the front suspension and brake system.
With the subframe blocked up I dismantled the engine. In cylinder #8 I found that
the top ring was broken in half. A deep grove was worn into the cylinder wall on
opposite sides of the piston. The lifters were all worn severly and were burred.
I had to pull out the cam and drop the lifters into the motor because they couldn't
be pulled out because of the burs.
With the motor still in the car I dismantled the front suspension and brake system.
With the subframe blocked up I dismantled the engine. In cylinder #8 I found that
the top ring was broken in half. A deep grove was worn into the cylinder wall on
opposite sides of the piston. The lifters were all worn severly and were burred.
I had to pull out the cam and drop the lifters into the motor because they couldn't
be pulled out because of the burs.With the motor and transmision pulled it was just a matter of removing the four bolts that held the subframe to the body. The removal of the subframe whould not be treated lightly. The re-installation of the subframe requires an accurate alignment to the body so that the front sheet metal fits properly and the car tracks straight going down the road. I was lucky I had a 1969 Camaro assembly manual (Firebird is not available). Since the subframes are the same the installation instructions are identical. According to the manual the front body mounts are aligned using two alignment pins. I took a few alignment measurements just in case.
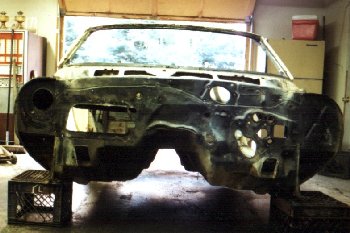 Here's a view of the firewall after everything was removed. After a good cleaning I
could not find any factory inspection marks. On the top of the firewall, in front of
the right wiper arm was stamped the car's VIN number. It was only visible when the
upper valance was removed. It matched the body tag and the VIN tag that was rivetted
to the top of the dash. So I knew that the car wasn't stolen and re-tagged.
Here's a view of the firewall after everything was removed. After a good cleaning I
could not find any factory inspection marks. On the top of the firewall, in front of
the right wiper arm was stamped the car's VIN number. It was only visible when the
upper valance was removed. It matched the body tag and the VIN tag that was rivetted
to the top of the dash. So I knew that the car wasn't stolen and re-tagged.
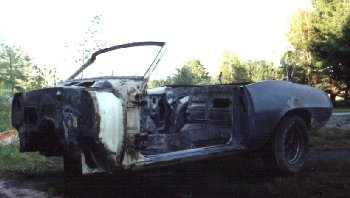 Here's the body fully dismantled except for the rear suspension. I left it on so
that I could roll the body in and out of the garage while I worked on it.
Here's the body fully dismantled except for the rear suspension. I left it on so
that I could roll the body in and out of the garage while I worked on it.
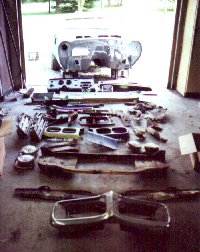 Here's most of the parts I removed minus the fenders and hood. Visible in this
picture are the front bumper, upper filler panel, radiator support, headlight
backing plates with headlights still mounted, outer head light bezels and
taillights, instrument cluster.
Here's most of the parts I removed minus the fenders and hood. Visible in this
picture are the front bumper, upper filler panel, radiator support, headlight
backing plates with headlights still mounted, outer head light bezels and
taillights, instrument cluster.
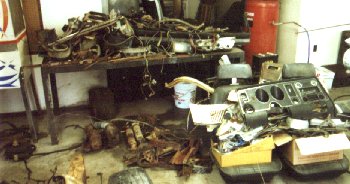 Here's some more parts piled up on a work bench. This is where things start to
get crowded when there's limited space. All of these parts were in need of cleaning and
restoration. That requires work space and storage space. As each part was restored it
I stored them covered in a spare bedroom.
Here's some more parts piled up on a work bench. This is where things start to
get crowded when there's limited space. All of these parts were in need of cleaning and
restoration. That requires work space and storage space. As each part was restored it
I stored them covered in a spare bedroom.